
Using MVVM Toolkit in .NET MAUI Applications

Summarize with AI:
Learn about the .NET MVVM Toolkit, a modern, fast and modular library you can use it in your .NET MAUI app.
In this article, we will explore the .NET MVVM Toolkit, a modular MVVM library maintained by Microsoft and part of the .NET Foundation, which can help you accelerate your MVVM-based developments in a very fast and easy way. Let’s get started!
What Is the .NET MVVM Toolkit?
The MVVM Toolkit is a modern, fast and modular library that you can use in different types of projects that support the use of MVVM, such as .NET MAUI, WPF, WinForms, etc. Since its API surface is identical across all these platforms, it is perfect for building shared libraries. Another great advantage it offers is that the types defined in the library are loosely coupled, so you can use only the APIs you need.
Integrating MVVM Toolkit into .NET MAUI Projects
.NET MAUI is a cross-platform framework where the MVVM pattern can be used, making it an ideal candidate for using the MVVM Toolkit. Let’s see how in the following sections.
Reviewing a Project with a Traditional MVVM Implementation
If you have worked with .NET MAUI, you have probably heard that for the properties of a View Model to send update notifications to the graphical interface, you must implement the INotifyPropertyChanged interface. Additionally, you need to trigger the PropertyChanged event when there is a change in properties.
Translating this into a practical example, let’s create an application that performs currency conversion. If you want to replicate this exercise, follow these steps:
- Create a .NET MAUI project without using the sample content.
- Follow the installation guide to add Progress Telerik UI for .NET MAUI controls.
- Create a new class called
CurrencyConverterViewModelor similar, and replace its content with the following:
namespace MauiExchangeDemo.ViewModels
{
    public class CurrencyConverterViewModel : INotifyPropertyChanged
    {
        private decimal amount;
        public decimal Amount
        {
            get => amount;
            set
            {
                if (amount != value)
                {
                    amount = value;
                    OnPropertyChanged(nameof(Amount));
                }
            }
        }

        private Currency selectedFromCurrency;
        public Currency SelectedFromCurrency
        {
            get => selectedFromCurrency;
            set
            {
                if (selectedFromCurrency != value)
                {
                    selectedFromCurrency = value;
                    OnPropertyChanged(nameof(SelectedFromCurrency));
                }
            }
        }

        private Currency selectedToCurrency;
        public Currency SelectedToCurrency
        {
            get => selectedToCurrency;
            set
            {
                if (selectedToCurrency != value)
                {
                    selectedToCurrency = value;
                    OnPropertyChanged(nameof(SelectedToCurrency));
                }
            }
        }

        private decimal result;
        public decimal Result
        {
            get => result;
            set
            {
                if (result != value)
                {
                    result = value;
                    OnPropertyChanged(nameof(Result));
                }
            }
        }

        public ObservableCollection<Currency> Currencies { get; set; }

        public ICommand ConvertCommand { get; }

        public CurrencyConverterViewModel()
        {
            Currencies = new ObservableCollection<Currency>
            {
                new Currency { Code = "USD", Rate = 1.0m },
                new Currency { Code = "EUR", Rate = 0.9m },
                new Currency { Code = "GBP", Rate = 0.8m },
                new Currency { Code = "JPY", Rate = 130.0m }
            };

            SelectedFromCurrency = Currencies[0];
            SelectedToCurrency = Currencies[1];

            ConvertCommand = new Command(ExecuteConvertCommand);
        }

        private void ExecuteConvertCommand()
        {
            if (SelectedFromCurrency == null || SelectedToCurrency == null)
                return;

            Result = Amount * (SelectedToCurrency.Rate / SelectedFromCurrency.Rate);
        }

        public event PropertyChangedEventHandler PropertyChanged;
        protected virtual void OnPropertyChanged(string propertyName)
        {
            PropertyChanged?.Invoke(this, new PropertyChangedEventArgs(propertyName));
        }
    }

    public class Currency
    {
        public string Code { get; set; }
        public decimal Rate { get; set; }
        public override string ToString() => Code;
    }
}
- For the graphical interface, I have chosen to use Telerik controls, as the UI library includes controls not available in .NET MAUI, allowing us to create better-looking interfaces that align with our goals. Replace the content of
MainPage.xamlwith the following:
<ContentPage...>
    <ScrollView>
        <StackLayout Padding="30" Spacing="25">
            <Label
                FontAttributes="Bold"
                FontSize="28"
                HorizontalOptions="Center"
                Text="Currency Converter"
                TextColor="#2E3A59" />
            <Border
                Padding="15"
                BackgroundColor="#F0F0F0"
                StrokeShape="RoundRectangle 10"
                StrokeThickness="0">
                <StackLayout>
                    <Label
                        FontSize="16"
                        Text="Amount:"
                        TextColor="#333333" />
                    <telerik:RadNumericInput
                        x:Name="input"
                        HeightRequest="50"
                        Maximum="1000000"
                        Minimum="0"
                        Step="0.01"
                        Value="{Binding Amount, Mode=TwoWay}" />
                </StackLayout>
            </Border>
            <Border
                Padding="15"
                BackgroundColor="#F0F0F0"
                StrokeShape="RoundRectangle 10"
                StrokeThickness="0">
                <StackLayout Spacing="10">
                    <Label
                        FontSize="16"
                        Text="From:"
                        TextColor="#333333" />
                    <telerik:RadComboBox
                        HeightRequest="50"
                        ItemsSource="{Binding Currencies}"
                        SelectedItem="{Binding SelectedFromCurrency}" />
                </StackLayout>
            </Border>
            <Border
                Padding="15"
                BackgroundColor="#F0F0F0"
                StrokeShape="RoundRectangle 10"
                StrokeThickness="0">
                <StackLayout Spacing="10">
                    <Label
                        FontSize="16"
                        Text="To:"
                        TextColor="#333333" />
                    <telerik:RadComboBox
                        HeightRequest="50"
                        ItemsSource="{Binding Currencies}"
                        SelectedItem="{Binding SelectedToCurrency}" />
                </StackLayout>
            </Border>
            <telerik:RadButton
                BackgroundColor="#007ACC"
                Command="{Binding ConvertCommand}"
                CornerRadius="8"
                HeightRequest="50"
                Text="Convert"
                TextColor="White" />
            <Border
                Padding="15"
                BackgroundColor="#E8F5E9"
                StrokeShape="RoundRectangle 10"
                StrokeThickness="0">
                <StackLayout HorizontalOptions="Center">
                    <Label
                        FontAttributes="Bold"
                        FontSize="18"
                        Text="Result:"
                        TextColor="#388E3C" />
                    <Label
                        FontSize="22"
                        Text="{Binding Result, StringFormat='{}{0:N2}'}"
                        TextColor="#388E3C" />
                </StackLayout>
            </Border>
        </StackLayout>
    </ScrollView>
</ContentPage>
In the CurrencyConverterViewModel class, you can see that the definition of properties takes up a lot of space, in addition to being highly repetitive. On the other hand, defining commands involves managing ICommand elements, from creating ICommand properties to initializing them by pointing to the method that executes the action. This can also become very repetitive if you have more than one command on your page.
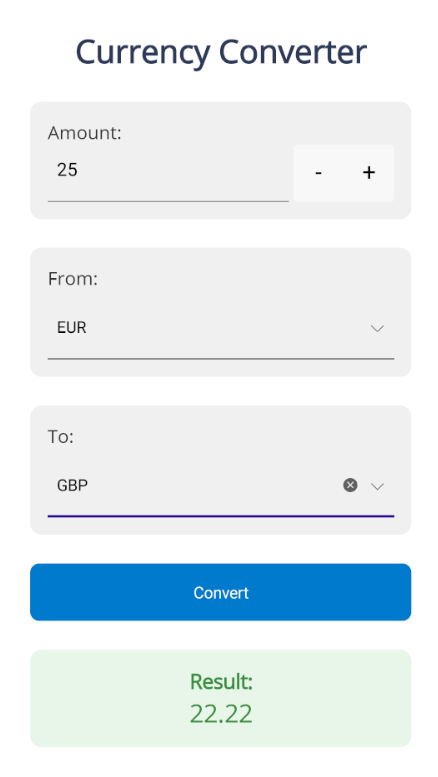
It is in these types of cases where MVVM Toolkit helps us simplify the code in our projects, allowing us to focus more on the application’s logic. Running the application with the previous code gives us the following result:
Installing MVVM Toolkit in the Project
To use MVVM Toolkit in our project, we need to add the Community.Toolkit.Mvvm NuGet package to our project. No other reference needs to be added to the project.
Simplifying Properties Using Source Generators
Source Generators are a feature introduced in .NET 5 that allows developers to generate additional code during project compilation. This means that C# code files can be produced and incorporated into the final assembly. This feature allows MVVM Toolkit to significantly simplify View Models by generating the repetitive code we saw earlier in a separate file, leaving only the field definitions in the ViewModel.
The way to use it is by inheriting the ViewModel from ObservableObject. Since the final class will be divided into more than one .cs file, the class must be declared as partial, as follows:
public partial class CurrencyConverterViewModel : ObservableObject
{
    ...
}
Once the model has inherited from ObservableObject, we must remove the full properties and leave only the field with the ObservableProperty attribute, which greatly simplifies the code as follows:
public partial class CurrencyConverterViewModel : ObservableObject
{
    [ObservableProperty]
    private decimal amount;

    [ObservableProperty]
    private Currency selectedFromCurrency;

    [ObservableProperty]
    private Currency selectedToCurrency;

    [ObservableProperty]
    private decimal result;
    ...
}
It is worth mentioning that there are several ways to define properties, including using lowerCamel syntax, starting the name with an underscore (_lowerCamel), or even starting with an m_ (m_lowerCamel). All these variations will generate a field using UpperCamel syntax.
If you want to check what happened behind the scenes during compilation, go to Your project | Dependencies | netX.0-android (X corresponds to the framework version) | Analyzers | CommunityToolkit.Mvvm.SourceGenerators | CommunityToolkit.Mvvm.SourceGenerators.ObservablePropertyGenerator, where you will find the classes generated by MVVM Toolkit. Inside the last tree node, you will find a class with the same name as your ViewModel, containing code similar to the following:
partial class CurrencyConverterViewModel
{
    ...
    public decimal Amount
    {
        get => amount;
        set
        {
            if (!global::System.Collections.Generic.EqualityComparer<decimal>.Default.Equals(amount, value))
            {
                OnAmountChanging(value);
                OnAmountChanging(default, value);
                OnPropertyChanging(global::CommunityToolkit.Mvvm.ComponentModel.__Internals.__KnownINotifyPropertyChangingArgs.Amount);
                amount = value;
                OnAmountChanged(value);
                OnAmountChanged(default, value);
                OnPropertyChanged(global::CommunityToolkit.Mvvm.ComponentModel.__Internals.__KnownINotifyPropertyChangedArgs.Amount);
            }
        }
    }

    ...

    [global::System.CodeDom.Compiler.GeneratedCode("CommunityToolkit.Mvvm.SourceGenerators.ObservablePropertyGenerator", "8.4.0.0")]
    partial void OnAmountChanging(decimal value);
    ...
    partial void OnAmountChanging(decimal oldValue, decimal newValue);
    ...
    partial void OnAmountChanged(decimal value);
    ...
    partial void OnAmountChanged(decimal oldValue, decimal newValue);
    ...
}
The above code will notify the UI of changes without requiring any additional implementation in the ViewModel. Additionally, you can see that methods ending in Changing are generated to act when the value is changing, as well as methods ending in Changed to perform an action when a value has finished updating. This can be implemented in your ViewModel as in the following example:
public partial class CurrencyConverterViewModel : ObservableObject
{
    ...
    partial void OnAmountChanged(decimal oldValue, decimal newValue)
    {
        Debug.WriteLine($"Amount changed from {oldValue} to {newValue}");
    }
    ...
}
Now let’s see how to simplify the use of commands using MVVM Toolkit.
Simplifying Commands Using Source Generators
Just like the ObservableProperty attribute simplifies the creation of properties in View Models, the RelayCommand attribute generates the necessary code to avoid boilerplate when creating commands.
To use it, you must be sure that your class is a partial class. The next step is to remove any references to ICommand in the View Model, leaving only the methods used to execute actions in your application, which will be adorned with the RelayCommand attribute. It is worth noting that this attribute has very flexible generation capabilities, allowing it to convert methods without parameters, with parameters, asynchronous methods and even those with CancellationToken as a parameter.
One thing to keep in mind is that the MVVM Toolkit will add the word Command to methods with the RelayCommand attribute. Therefore, if you usually name your commands this way, I recommend renaming them. In our example, the method would look like this:
[RelayCommand]
private void Convert()
{
    if (SelectedFromCurrency == null || SelectedToCurrency == null)
        return;

    Result = Amount * (SelectedToCurrency.Rate / SelectedFromCurrency.Rate);
}
Remember that in the XAML code, you should continue referencing the full command name (including the Command suffix), as in the following example:
 <telerik:RadButton
     BackgroundColor="#007ACC"
     Command="{Binding ConvertCommand}"
     CornerRadius="8"
     HeightRequest="50"
     Text="Convert"
     TextColor="White" />
After compiling the project, we can check the path Your project | Dependencies | netX.0-android (X corresponds to the framework version) | Analyzers | CommunityToolkit.Mvvm.SourceGenerators | CommunityToolkit.Mvvm.SourceGenerators.RelayCommandGenerator, where we will find a class with the same name as the View Model and a structure similar to the following:
partial class CurrencyConverterViewModel
{
    /// <summary>The backing field for <see cref="ConvertCommand"/>.</summary>
    [global::System.CodeDom.Compiler.GeneratedCode("CommunityToolkit.Mvvm.SourceGenerators.RelayCommandGenerator", "8.4.0.0")]
    private global::CommunityToolkit.Mvvm.Input.RelayCommand? convertCommand;
    /// <summary>Gets an <see cref="global::CommunityToolkit.Mvvm.Input.IRelayCommand"/> instance wrapping <see cref="Convert"/>.</summary>
    [global::System.CodeDom.Compiler.GeneratedCode("CommunityToolkit.Mvvm.SourceGenerators.RelayCommandGenerator", "8.4.0.0")]
    [global::System.Diagnostics.CodeAnalysis.ExcludeFromCodeCoverage]
    public global::CommunityToolkit.Mvvm.Input.IRelayCommand ConvertCommand => convertCommand ??= new global::CommunityToolkit.Mvvm.Input.RelayCommand(new global::System.Action(Convert));
}
You can see that the Source Generator has automatically created the ConvertCommand, which we are using from the XAML code.
With these changes, the application would behave the same way, with the great advantage that we have reduced the code to just a few lines, as seen below:
public partial class CurrencyConverterViewModel : ObservableObject
{
    [ObservableProperty]
    private decimal amount;

    [ObservableProperty]
    private Currency selectedFromCurrency;

    [ObservableProperty]
    private Currency selectedToCurrency;

    [ObservableProperty]
    private decimal result;

    public ObservableCollection<Currency> Currencies { get; set; }

    public CurrencyConverterViewModel()
    {
        Currencies = new ObservableCollection<Currency>
        {
            new Currency { Code = "USD", Rate = 1.0m },
            new Currency { Code = "EUR", Rate = 0.9m },
            new Currency { Code = "GBP", Rate = 0.8m },
            new Currency { Code = "JPY", Rate = 130.0m }
        };

        SelectedFromCurrency = Currencies[0];
        SelectedToCurrency = Currencies[1];

    }

    [RelayCommand]
    private void Convert()
    {
        if (SelectedFromCurrency == null || SelectedToCurrency == null)
            return;

        Result = Amount * (SelectedToCurrency.Rate / SelectedFromCurrency.Rate);
    }
}
Without a doubt, this represents a significant improvement in having more simplified code.
Exchanging Messages Between Objects
Another useful feature in .NET MAUI is the use of the IMessenger interface, which defines a contract for types that can be used to exchange messages between different objects. If you have ever worked with Xamarin Forms, this is the replacement for MessagingCenter, but improved to avoid the problems MessagingCenter had.
The MVVM Toolkit offers two default implementations of IMessenger: WeakReferenceMessenger and StrongReferenceMessenger, each with unique characteristics. In the case of WeakReferenceMessenger, some of its advantages include:
- Uses weak references, meaning it automatically avoids memory leaks
- It is decoupled
- More efficient in performance and scalability
- Fully integrated with the MVVM Toolkit
On the other hand, StrongReferenceMessenger uses strong references, meaning it is the implementer’s responsibility to manually unsubscribe recipients once they are no longer needed. However, it offers better performance and lower memory usage in return.
Let’s create an example using WeakReferenceMessenger. Suppose, for some reason, we need to communicate from the View Model to the code-behind of the UI file to pass, for example, the conversion result. The first step is to define a message that specifies the type of data we need to pass. In our case, the message will be as follows:
public class ConversionCompletedMessage : ValueChangedMessage<decimal>
{
    public ConversionCompletedMessage(decimal value) : base(value)
    {
    }
}
In the code above, you can see that we inherit from the ValueChangedMessage class, which is designed to carry a value associated with a message. By doing this, we inherit a Value property that stores the data we want to send.
Next, let’s modify the View Model so it is responsible for sending an update with the conversion result:
public partial class CurrencyConverterViewModel : ObservableObject
{
    ...
    [RelayCommand]
    private void Convert()
    {
        if (SelectedFromCurrency == null || SelectedToCurrency == null)
            return;

        Result = Amount * (SelectedToCurrency.Rate / SelectedFromCurrency.Rate);

        WeakReferenceMessenger.Default.Send(new ConversionCompletedMessage(Result));
    }
    ...
}
The final step is to register the message recipient. In our example, we will go to the MainPage.xaml.cs file, where we will display the value using a DisplayAlert as follows:
public partial class MainPage : ContentPage
{
    public MainPage()
    {
        InitializeComponent();
    }

    protected override void OnAppearing()
    {
        WeakReferenceMessenger.Default.Register<ConversionCompletedMessage>(this, (recipient, message) =>
        {
            DisplayAlert("Conversion Completed", $"The conversion result is: {message.Value:N2}", "OK");

        });
    }
}
Conclusion
Throughout this article, you have learned about some features of the MVVM Toolkit that you can use in your .NET MAUI projects to streamline development.
First, you saw how to simplify your View Models using the ObservableObject class and the ObservableProperty and RelayCommand attributes. You also learned how to create communication channels using implementations of the IMessenger interface.
Undoubtedly, this powerful framework has many more hidden gems—it’s time to use it in your projects to simplify your ViewModels.
Ready to try out Telerik UI for .NET MAUI? These components come with a free 30-day trial.

Héctor Pérez
Héctor Pérez is a Microsoft MVP with more than 10 years of experience in software development. He is an independent consultant, working with business and government clients to achieve their goals. Additionally, he is an author of books and an instructor at El Camino Dev and Devs School.
Related Posts
Comments
All articles
Topics
Web MobileMobile
Desktop
Design
Productivity
People
