State Management in React vs. Angular

This guide shows how to handle common state management tasks using two popular web technologies. It aims to simplify the process for people new to these technologies and help them evaluate their preferred options for state management.
State refers to the data that powers applications, while state management focuses on the creation/retrieval, organization, sharing, access and modification of this data to maintain app responsiveness and performance.
This guide will delve into two web technologies: React and Angular. We’ll begin with a basic explanation of the core APIs these technologies offer for state management. Next, we’ll look at common state management concerns encountered in real-world applications and how they can be handled at a basic level using these technologies. Finally, we will list some state management libraries currently available in these technologies’ ecosystems.
Prerequisites
This guide assumes that you have:
- Familiarity with TypeScript
- Basic understanding of what components are in web applications
- Experience with a frontend framework
Project Setup
Let us start by cloning these repos to create basic React and Angular projects.
https://github.com/christiannwamba/state-mgt-react
Next clone the Angular project.
https://github.com/christiannwamba/state-mgt-ng
The only external library we added apart from the default packages that come with React and Angular is Axios, which will be used for data fetching.
It’s important to note that, in our React project, the root file is App.tsx, while in our Angular project, the root file is app.component.ts.
State Management Tasks
State management usually involves the following tasks:
- Creating state
- Modifying state, which refers to changing your app’s contents in response to UI interactions
- Generating computed values from the state
- Distributing state, which involves sharing stateful data among components
State synchronization is another important aspect of state management. It checks that stateful data is consistently in sync with the UI. However, we won’t be managing this ourselves. For the most part, these technologies handle this task for us to make our apps reactive.
Both React and Angular provide us with the relevant APIs to manage the simple-looking, but complex task of state management and reactivity in our applications. They handle some of the tasks mentioned above.
Component State Management
State Creation and Modification
Let’s start with simple component state management in Angular and React applications. Here, we will describe two things:
- We will build a basic counter to show how to create and modify state. This will allow us to explore the core primitives each tool provides for state management.
- We will show how to fetch data over the network to create a state from this data.
React
React provides us with two hooks for our state management needs: useState and useReducer. The useState hook is simpler and more suitable for basic state management. Let’s start with useState. Create a file named Counter.tsx and add the following to it:
import { useState } from "react";
import "./App.css";
function Counter() {
  const [count, setCount] = useState(0);
  return (
    <div>
      <p>{count}</p>
      <button onClick={() => setCount(count + 1)}> increment</button>
    </div>
  );
}
export default Counter;
We use the useState() hook to store the counter’s initial value. This hook returns an array with the current state value and a setter function that can be used to update it.
When we invoke this function to update the value—in our case, where we increment the counter—React is able to detect this change. It then updates the value of our count variable and automatically syncs this value with the UI, using its diffing algorithm for change detection.
Angular
In Angular, all components are classes. Basic state management can be done by creating instance variables and updating them as required. Let’s create a counter component named counter.component.ts.
@Component({
  selector: "counter",
  standalone: true,
  imports: [],
  template: `
    <div>
      <p>{{ count }}</p>
      <button (click)="incrementCounter()">increment</button>
    </div>
  `,
  styles: ``,
})
export class Counter {
  count = 0;
  incrementCounter() {
    this.count++;
  }
}
Our counter component maintains an instance variable called count and a method called increment() to update its value whenever the button is clicked. When the counter updates, Angular is able to detect that the count has changed, thanks to the Zone.js library it uses internally. This library prompts Angular to re-render the counter component, update its value and reflect it in the UI.
Getting Stateful Data over the Network
Since most of the data used in real-world applications comes from databases accessible over a network, it is necessary to show how to retrieve this data from the network and use it to create an application state. Here, we’ll look at the React and Angular component lifecycles and show when we normally fetch data to set up our application state.
Usually, when retrieving data from the network, we keep a boolean to show the loading state until the data arrives. When the data arrives, it’s usually in the form of JSON, which we can then store locally in our app as state.
React
Create a file called DataFetching.tsx and add the following to it:
import axios from "axios";
import React, { useEffect, useState } from "react";
type user = {
  id: number;
  name: string;
  username: string;
};
function DataFetching() {
  const [users, setUsers] = useState<user[]>([]);
  const [loading, setLoading] = useState<boolean>(true);
  async function getUsers() {
    setLoading(true);
    const res = await axios.get<user[]>("https://jsonplaceholder.typicode.com/users");
    setUsers(res.data);
    setLoading(false);
  }
  useEffect(() => {
    getUsers();
  }, []);
  return <div>{loading ? <h1>loading</h1> : users.map((user) => <p key={user.id}>{user.name}</p>)}</div>;
}
export default DataFetching;
Here, we are managing two states: one for the users and another for a loading state, which we initially set to false. The useEffect function allows us to run logic when a component mounts, a state change occurs or a component unmounts. When the component mounts, we trigger the getUsers() function. This function toggles the loading state, fetches users from the network and stores the data in the state.
Angular
Similarly, in our Angular app, let’s create a file called data-fetching.component.ts and update it with the following:
import { Component, OnInit } from '@angular/core';
import { AuthService } from './auth.service';
import axios from 'axios';

type user = {
  id: number;
  name: string;
};
@Component({
  selector: 'data-fetching',
  template: `
    <div>
      @if(loading){
      <h1>loading_</h1>
      } @for( user of users; track user.id){
      <p>{{ user.name }}</p>
      }
    </div>
  `,
  styles: [``],
  standalone: true,
})
export class DataFetchingComponent implements OnInit {
  loading = false;
  users: user[] = [];
  async ngOnInit() {
    this.loading = true;
    this.users = await this.getUsers();
    this.loading = false;
  }
  async getUsers() {
    const users = await axios.get<user[]>(
      'https://jsonplaceholder.typicode.com/users'
    );
    return users.data;
  }
}
The ngOnInit() is a special function in every component’s lifecycle in an Angular application. This function is fired automatically when our component is initialized, and this is where data fetching tasks take place. Here, we fetched some data, toggled the component’s loading state and fetched the user’s data over the network.
Generating Computed Values from State
Typically, when building an application, the state may be computed to generate a new value whenever the state changes, which will then be rendered, e.g., generating a list of completed todos from a list of todos. Let’s make our counter do one more thing. Each time we update the counter, we want to also display the square of its current value.
React
Update your Counter.tsx file with the following:
const [count, setCount] = useState(0);
const countSquare = count * count;
return (
  <div>
    <p>{count}</p>
    <button onClick={() => setCount(count + 1)}> increment</button>
    <p> the square of the count is {countSquare}</p>
  </div>
);
While you could directly embed {count*count} into the returned JSX in this simple example, the point here is that we can recompute other values from the state, just like we would use regular variables to generate computed ones.
Angular
@Component({
  template: `
    <div>
      <p>{{ count }}</p>
      <button (click)="incrementCounter()">increment</button>
      <p>the square of the count is {{ countSquare }}</p>
    </div>
  `,
  styles: ``,
})
export class Counter {
  count = 0;
  countSquare = 0;
  incrementCounter() {
    this.count++;
    this.countSquare = this.count * this.count;
  }
}
In our counter application, we calculate the square of the current counter value and store it in the countSquare variable.
If you look closely at our Angular application, you’ll notice that each time we increase the counter, we also have to compute the counterSquare. For this reason, Angular also provides two alternative reactive primitives to generate computed values of the state and manage reactivity in Angular applications. These are known as observables and signals.
Now, let’s build a signal version of our counter. Create a file named signal-counter.component.ts and add the following to it:
import {
  ChangeDetectionStrategy,
  Component,
  OnInit,
  computed,
  signal,
} from "@angular/core";
@Component({
  selector: "signal-counter",
  standalone: true,
  imports: [],
  template: `
    <div>
      <p>{{ count() }}</p>
      <button (click)="incrementCounter()">increment signal counter</button>
      <p>the square of the count iss {{ countSquare() }}</p>
    </div>
  `,
  styles: ``,
  changeDetection: ChangeDetectionStrategy.OnPush,
})
export class SignalCounter {
  count = signal(0);
  countSquare = computed(() => this.count() * this.count());
  incrementCounter() {
    this.count.update((c) => c + 1);
  }
}
Our count state is now managed using a signal. Each time we call incrementCounter and update the value of the counter, the countSquare signal is also recomputed. This is because the callback passed to the special computed() function is configured to run each time our count signal changes
Another more powerful construct is an observable. One common JavaScript library for creating and consuming observables is RxJS. Let us create a version of our counter that uses observables. Create a file called observable.counter.ts and add the following to it:
import { CommonModule } from "@angular/common";
import { Component, OnInit } from "@angular/core";
import { BehaviorSubject, map } from "rxjs";
@Component({
  selector: "observable-counter",
  template: ` <div>
    <h1>observable counter</h1>
    <p>{{ count | async }}</p>
    <button (click)="incrementCounter()">increment</button>
    <p>the square of the count is {{ countSquare | async }}</p>
  </div>`,
  standalone: true,
  imports: [CommonModule],
})
export class ObservableCounter implements OnInit {
  count = new BehaviorSubject() < number > 0;
  countSquare = this.count.pipe(map((count) => count * count));
  incrementCounter() {
    this.count.next(this.count.value + 1);
  }
  ngOnInit(): void {}
}
We wrap the value of our counter in a special type of observable known as BehaviorSubject. If you are new to observables, they are powerful constructs that allow us to work with both synchronous and asynchronous streams of data. Think of it as a physical pipe with some data flowing through it.
Data produced by observables can only be consumed by subscribing to them. BehaviorSubjects are just observables that allow us to push some value through this pipe and allow us to read the latest content that flows through the pipe.
The incrementCounter function pushes a new value to the counter observable. When this happens, the counterSquare observable is updated with a new observable holding the square of the count observable.
Notice that in the rendered template, we use the async pipe to render the observable. The async pipe subscribes to and renders the latest value of the observable. The async pipe is available because we included the CommonModule in our component’s provider array.
Note that signals and observables are not constructs unique to Angular; we will only discuss them here because they are included by default in our Angular application. Also, observables and signals can be used for more sophisticated use cases than the ones discussed here; we only used this as a simple example.
If you are wondering whether to use signals, observables or plain instance variables in your Angular applications, starting with the simplest option that suits your needs is important. If you have to handle more complex issues, use signals, then resolve to observables when you explicitly need them for more sophisticated apps.
Sharing State Between Components
Stateful data in applications is typically shared between components. This is why an important question developers need to answer when building applications is deciding where the stateful data should live.
In this section, we will discuss two of the most common use cases:
- The first will be on how stateful data can be passed from a parent component to a first or second-level child component.
- The second will be on how to pass stateful data from a parent component to a deeply nested child in our application structure.
Passing State from Parent to a Child at the First or Second Level
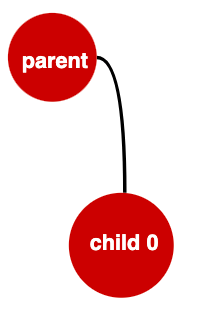
Here, we will include a CounterDisplay component in our Angular and React apps. This component will receive the current value of the counter from its parent Counter component and display it in a paragraph.
React
Data is passed from parent to child components in React via props. Create a CounterDisplay.tsx file and the following to it:
function CounterDisplay({ count }: { count: number }) {
  return <p>{count}</p>;
}
export default CounterDisplay;
Let’s now update our Counter.tsx file to pass the current value of the counter to our CounterDisplay component.
import CounterDisplay from "./CounterDisplay";
function Counter() {
  const [count, setCount] = useState(0);
  const countSquare = count * count;
  return (
    <div>
      <CounterDisplay count={count} />
      <button onClick={() => setCount(count + 1)}> increment</button>
      <p> the square of the count is {countSquare}</p>
    </div>
  );
}
export default Counter;
Angular
Similarly let’s create a counter-display.component.ts file and add the following to it:
import { Component, Input } from '@angular/core';
@Component({
  selector: 'counter-display',
  standalone: true,
  imports: [],
  template: `
    <p>
      {{ count }}
    </p>
  `,
  styles: ``,
})
export class CounterDisplayComponent {
  @Input('counter') count!: number;
}
The @input decorator allows our counter display component to receive some data from a parent component that renders it. Likewise, let’s update the counter.component.ts file to display this component and provide it with some data.
import { Component } from "@angular/core";
import { CounterDisplayComponent } from "../counter-display/counter-display.component";
@Component({
  selector: "counter",
  standalone: true,
  imports: [CounterDisplayComponent],
  template: `
    <div>
      <counter-display [count]="count" />
      <button (click)="incrementCounter()">increment</button>
      <p>the square of the count is {{ countSquare }}</p>
    </div>
  `,
  styles: ``,
})
export class Counter {
  count = 0;
  countSquare = 0;
  incrementCounter() {
    this.count++;
    this.countSquare = this.count * this.count;
  }
  now() {
    return new Date().toISOString();
  }
}
Passing Stateful Data from a Parent to a Child That Is Deep Within Our Application Tree
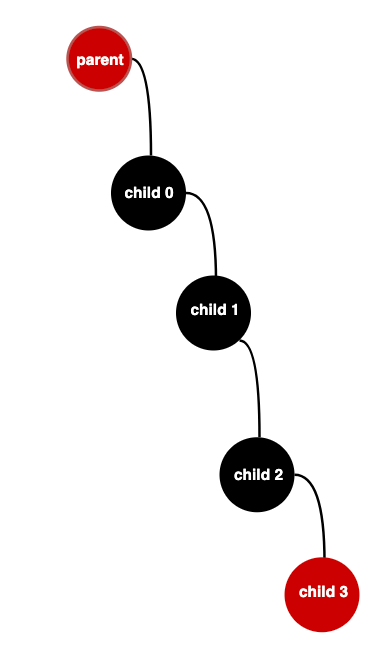
In this case, our example will be a simple authentication system where we want to maintain some stateful data that manages the user’s authentication state.
In typical real-world applications, a deeply nested component might need access to the currently authenticated user’s data. Passing that kind of state from a parent to its children and further nested children like we did in the previous use case is not ideal. Both React and Angular provide their solutions to handle this scenario.
Our authentication system will expose three things: a simple boolean isLoggedIn, login and logOut functions to change the value of this boolean to true and false, respectively.
React
React provides a construct called Context, which uses a Publish-Subscribe pattern. The Context is placed at any level in our application tree and exposes (publishes) data it wants to be made accessible. Child components can read and, if necessary, modify the contents of this Context, effectively consuming the Context’s contents. Whenever the Context is modified, subscribers get the new value.
A simple diagram showing this idea is displayed below. The Context is placed at the top of our app’s component tree.
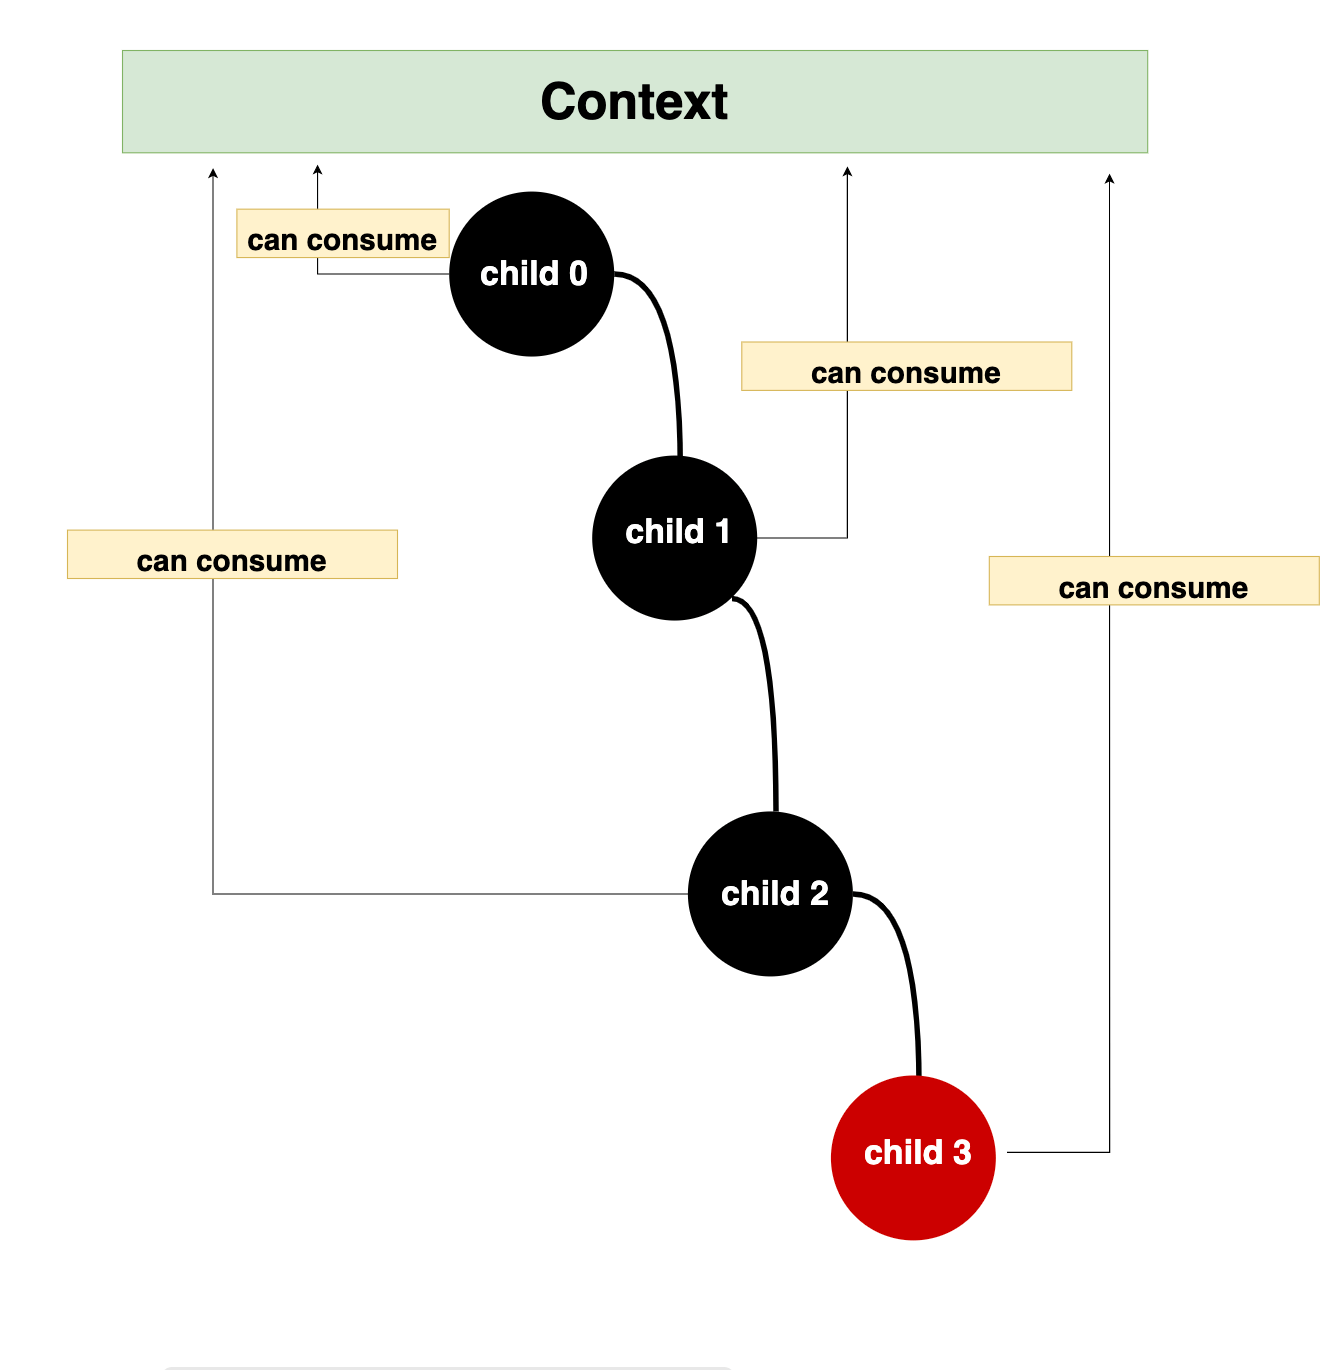
At the end of the day, we want to have the structure below.
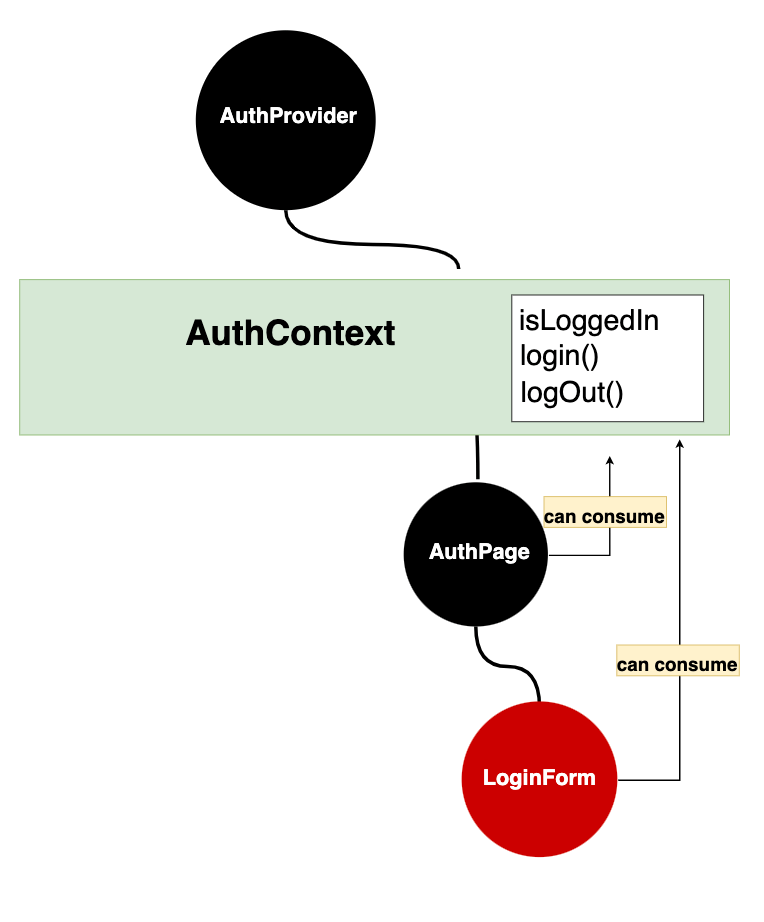
Our AuthProvider exposes an Authcontext that will be consumed by our LoginForm, a child of AuthPage.
Let’s create a file called AuthContext.tsx. We will update this file in parts, so let’s start by creating a context.
import React, { PropsWithChildren, createContext, useState } from "react";
export const AuthContext = createContext<{
  isLoggedIn: boolean;
  login(): void;
  logOut(): void;
}>({
  isLoggedIn: false,
  login() { },
  logOut() { },
});
The context is created using the createContext function. This context holds an object with some default properties.
The context created does nothing for now. Let’s create a component called AuthProvider in the same file.
import { AuthContext } from "./AuthContext"
function AuthProvider({ children }: PropsWithChildren) {
  const [isLoggedIn, setIsLoggedIn] = useState<boolean>(false);
  function login() {
    setIsLoggedIn(true);
  }
  function logOut() {
    setIsLoggedIn(false);
  }
  return ()
}
Our AuthProvider will receive a tree of React nodes/components as props via the children prop, a special prop in React. This component defines some state to manage the isLoggedIn boolean and defines login and logOut functions to modify this state.
We will then use our AuthContext to provide these values and update the return statement accordingly.
return (
  <AuthContext.Provider
    value={{
      isLoggedIn,
      login,
      logOut,
    }}
  >
    {children}
  </AuthContext.Provider>
);
Our AuthContext has a special React component called Provider, which has a value prop. We feed the isLoggedIn, login, and LogOut properties to it. Whatever we pass in this value prop is accessible to any nodes rendered between its <AuthContext.Provider> opening and closing tags using the children prop.
Now let’s use our AuthProvider component in our app. Update your App.tsx file:
function App() {
  return (
    <>
      <Counter />
      <AuthProvider>
        <AuthPage />
      </AuthProvider>
    </>
  );
}
The wrapped component—AuthPage—is fed as the children prop to its wrapperz—AuthProvider. Let’zs now create our AuthPage component. Create a file named AuthPage.tsx and add the following to it:
import LoginForm from "./LoginForm";
function AuthPage() {
  return <LoginForm />;
}
export default AuthPage;
Our AuthPage component renders a LoginForm component which we are yet to define. The relationship between our AuthProvider, AuthContext, AuthPage and LoginForm is illustrated in the diagram below.
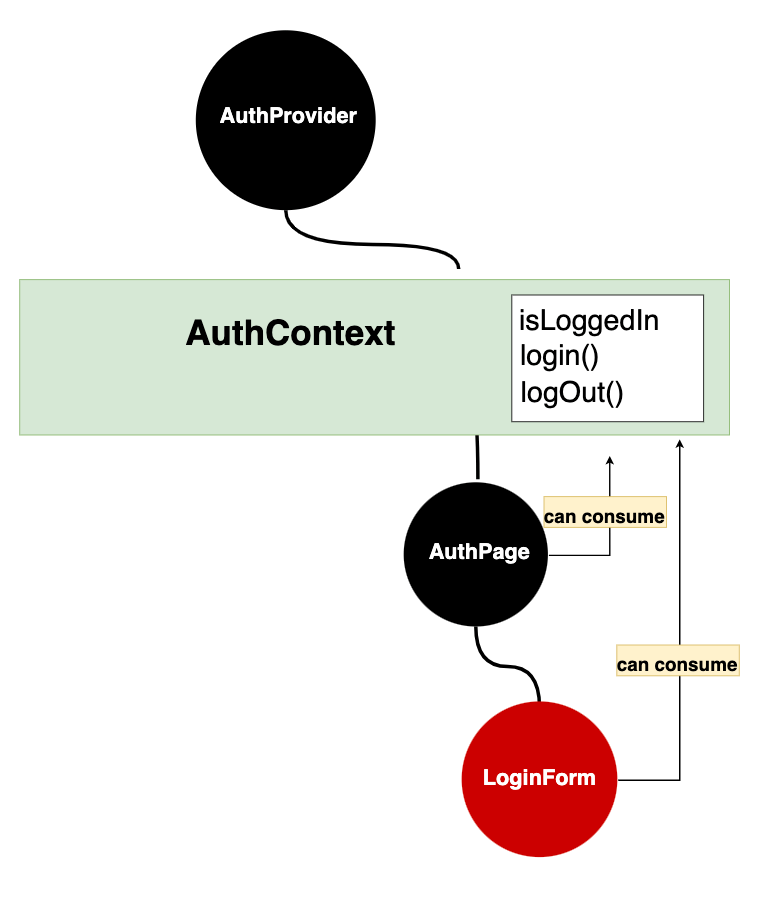
Both the Authpage and LoginForm components have access to the contents of the AuthContext, but since we only want to use it in our LoginForm let’s create a LoginForm.tsx file and add the following to it:
import { useContext } from "react";
import { AuthContext } from "./AuthProvider";
function LoginForm() {
  const { isLoggedIn, login, logOut } = useContext(AuthContext);
  return (
    <div>
      {isLoggedIn ? (
        <button onClick={logOut}>log out</button>
      ) : (
        <button onClick={login}>login</button>
      )}
    </div>
  );
}
Using React’s useContext hook, the LoginForm component can retrieve the AuthContext value because it is possible to have multiple contexts in an App. The useContext hook is fed the exact context we are interested in—in our case, AuthContext. When we preview our application, we see that our LoginForm can use our AuthContext.
Angular
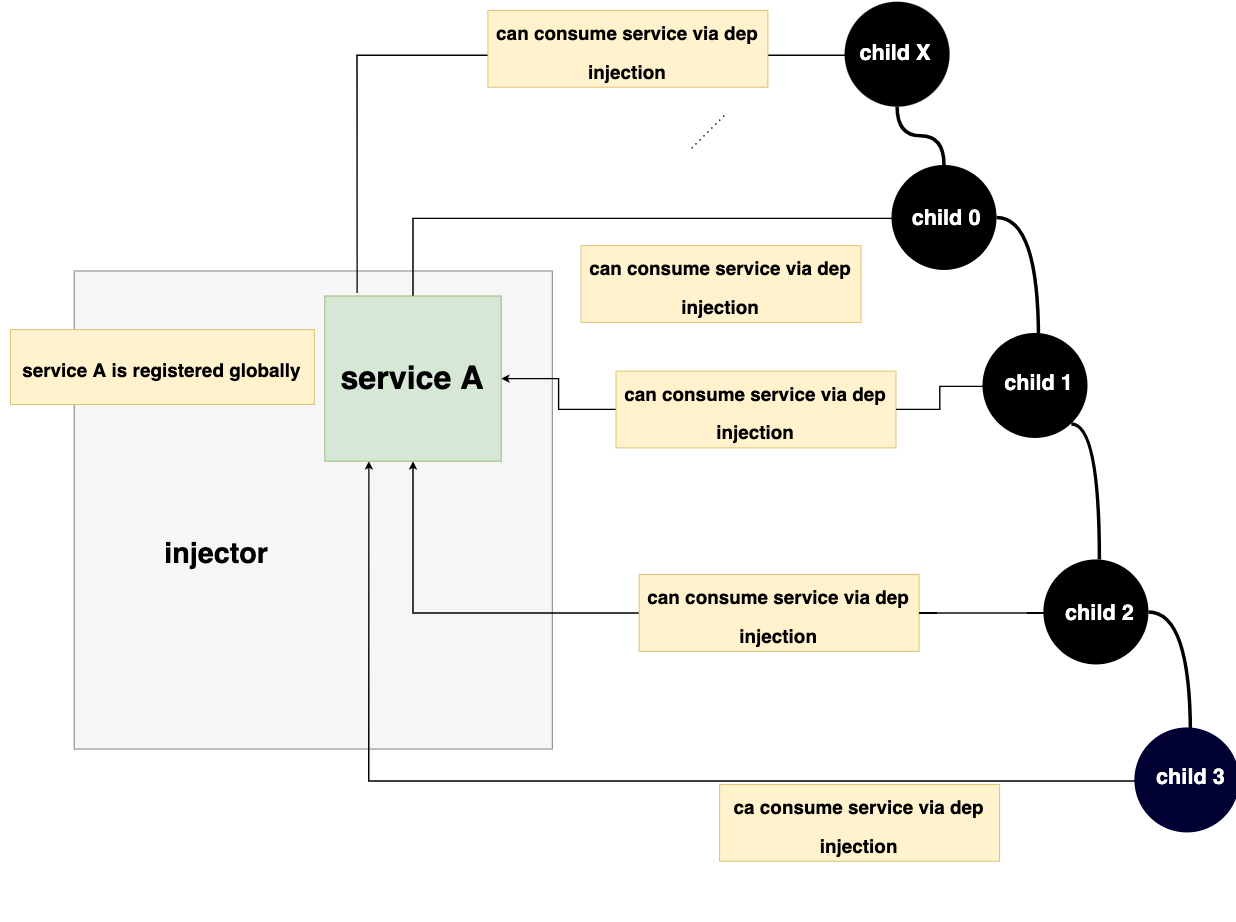
In Angular, services also enable components to share logic following a pub-sub model. A service is just a class with some logic, including stateful data and methods. This class is then registered in the app, either globally or by module, at any level of our application tree.
When a service is registered globally, all components in our app can consume this service. Note that only one instance of this service is maintained globally.
Components consume services via dependency injection from their constructor or using the inject() function, and dependencies such as services are supplied by Angular’s injector.
Below is a diagram showing this process for a globally registered service, which is a typical use case.
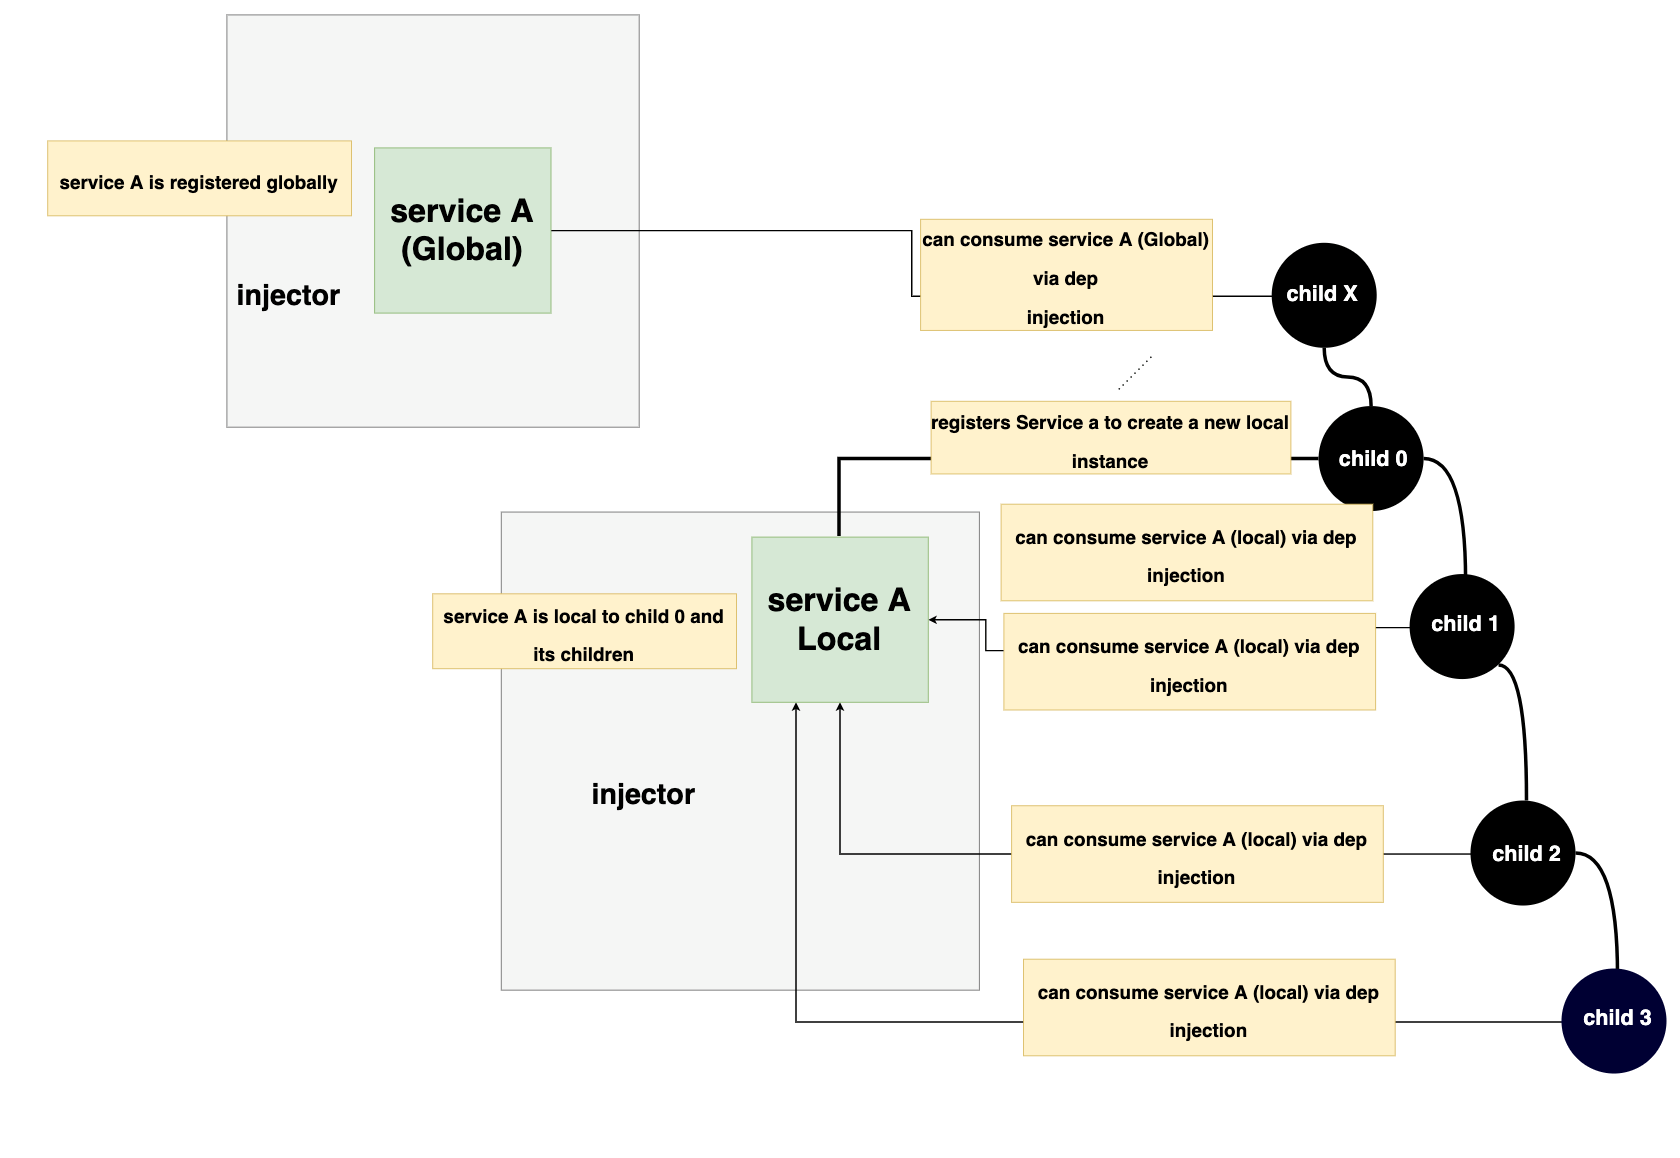
However, when a service (e.g., A) is scoped to some component (e.g., Child 0), then only the components that are children of the Child will have access to A. Scoping a service to a component means that the component includes the service in its provider array.
In our case, we will create a simple authentication service in a file called auth.service.ts. Our LoginForm component, which is a child of AuthPage will consume the auth service.
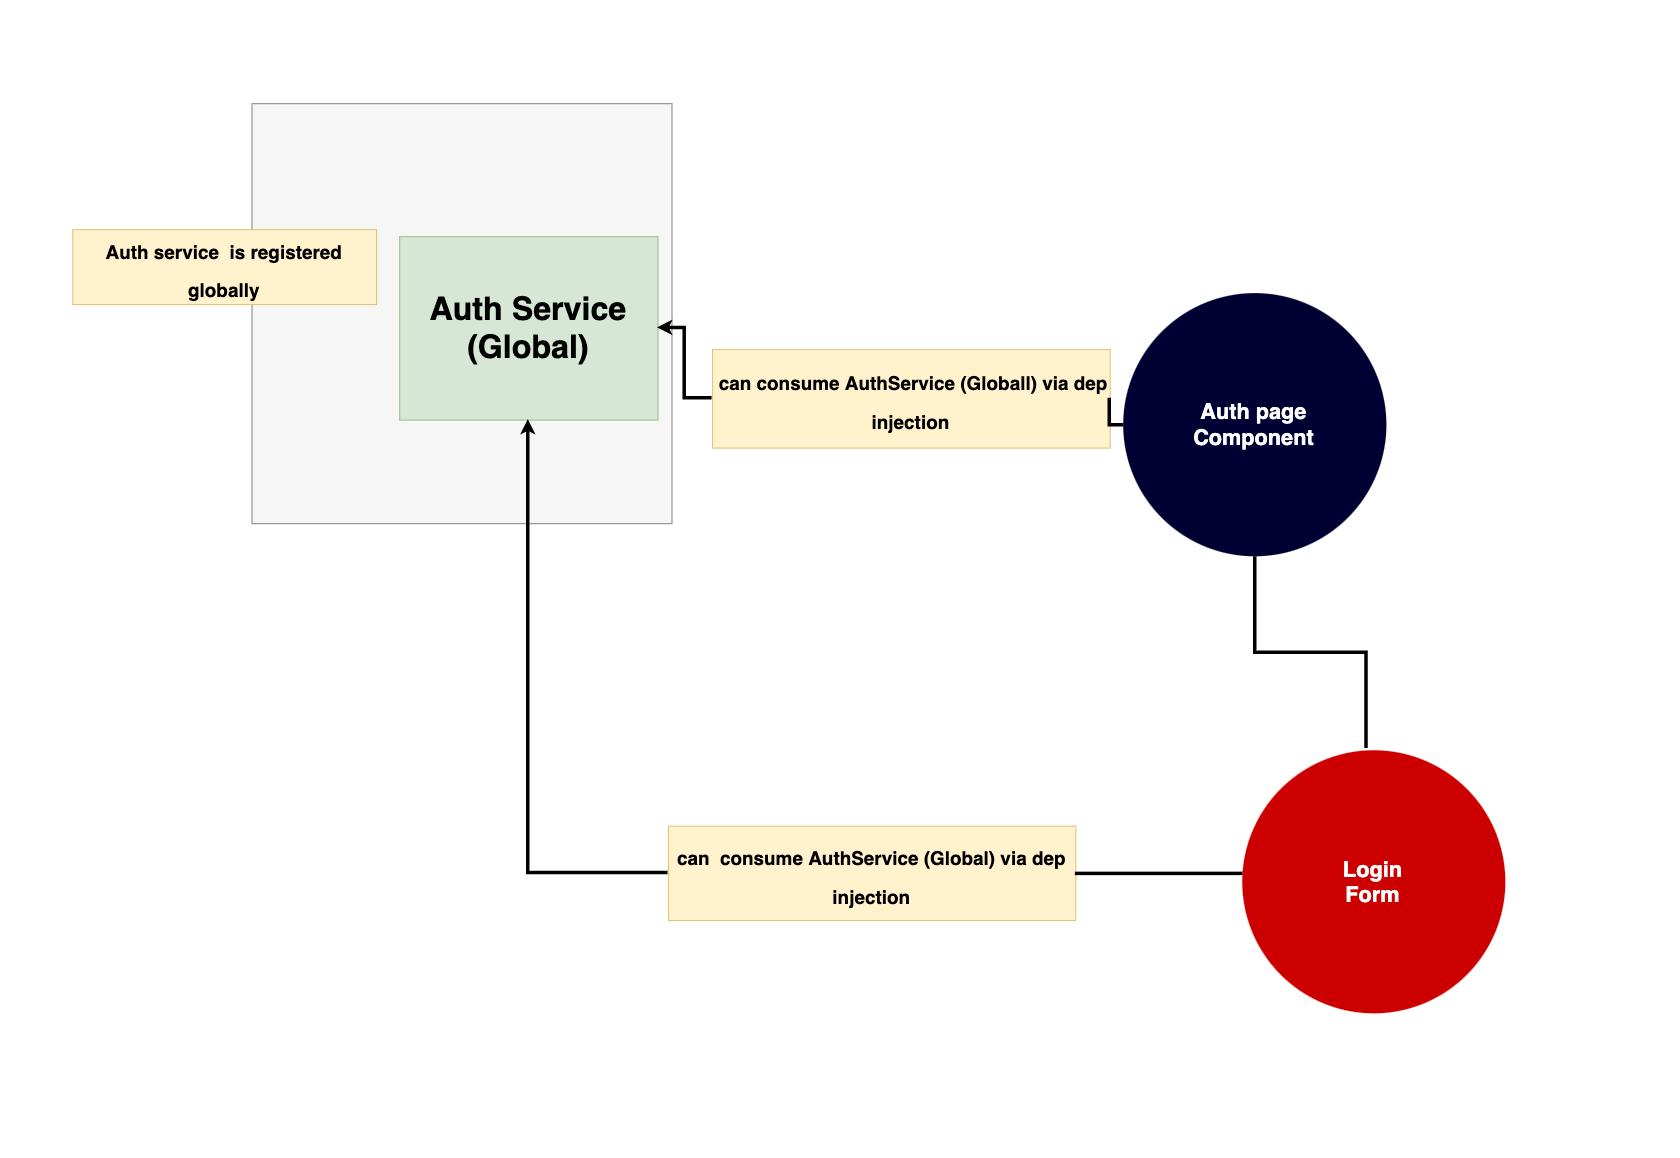
Let’s create a service called AuthService in a file called auth.service.ts, and add the following to it:
import { Injectable } from "@angular/core";
@Injectable({
  providedIn: "root",
})
export class AuthService {
  constructor() {}
  isLoggedIn = false;
  login() {
    this.isLoggedIn = true;
  }
  logOut() {
    this.isLoggedIn = false;
  }
}
The providedIn: "root" specifies that this service should be registered in the global injector. Now let’s use this service in our LoginForm component. But before doing that, let’s create our AuthPageComponent.
We don’t need the
AuthPageComponentto consume the auth service. We are only doing this to match our React example.
import { LoginFormComponent } from "./login-form.component";
@Component({
  selector: "auth-page-using-service",
  template: ` <login-form /> `,
  styles: [``],
  standalone: true,
  providers: [AuthService],
  imports: [LoginFormComponent],
})
export class AuthPageUsingService {}
Next, let’s update our login-form.component.ts file.
import { Component } from "@angular/core";
import { AuthService } from "./auth.service";
@Component({
  selector: "login-form",
  standalone: true,
  imports: [],
  template: `
    <div>
      @if(authService.isLoggedIn){
      <button (click)="authService.logOut()">log out</button>
      } @else {
      <button (click)="authService.login()">login</button>
      }
    </div>
  `,
  styles: ``,
})
export class LoginFormComponent {
  authService: AuthService = inject(AuthService);
}
Our LoginFormComponent requests for the AuthService, using the inject() function and uses it in its template to access its contents—isLoggedIn, logOut and login properties. When we preview our application, we see that we can log in and out.
State Management Libraries in React and Angular
Here is a list of some libraries that can be used for state management in React and Angular.
React
Angular
Conclusion
Managing state effectively is an important aspect of building web applications. This guide shows how to handle common state management tasks using two popular web technologies. It aims to simplify the process for people new to these technologies and help them evaluate their preferred options for state management.

Christian Nwamba
Chris Nwamba is a Senior Developer Advocate at AWS focusing on AWS Amplify. He is also a teacher with years of experience building products and communities.

