How to Optimize File Management in Next.js

Summarize with AI:
Let’s explore how to optimize file management in a modern application using Edge Store. We’ll see some of the benefits it provides, the configuration processes and how to implement some of its features in a Next.js application.
When building modern web applications, it is almost unavoidable to deal with files one way or the other. This could involve collecting user images, managing videos, generating or hosting PDFs, among other file-related tasks. However, manually handling and managing these files in Next.js applications can be challenging. It is not only time-consuming and prone to errors but also lacks features for optimization and scalability.
While numerous file management options are available, this article will focus on Edge Store. Edge Store was introduced as a type-safe solution that simplifies file management in web applications by abstracting the complexities of working with files. It eliminates the need to worry about factors like integration, performance, speed, support for large files, and validation, among others.
In this article, we will explore some of the benefits Edge Store provides, the configuration processes, and how to implement its features in a Next.js application.
What Is Edge Store?
Simply put, Edge Store is a developer-friendly package that simplifies file management in web applications. With type safety at its core, it enables the upload and retrieval of files from remote cloud storage with minimal setup and configuration.
In addition, it also provides a broad set of benefits that help make the handling of files efficient, more secure and user friendly.
Here are some of its benefits:
Type safety: TRPC was a huge source of reference when building the Edge Store package; therefore, it shares many patterns with TRPC and offers strict type safety during implementation.
Simple integration: Edge Store allows effortless integration with modern web applications. It provides two adapters for Next.js, each for the App Router and Pages Router. These adapters streamline the process of integrating Edge Store in Next.js applications. Edge Store also provides an Express adapter in cases where we have an Express.js backend and a create-react-app or Vite React frontend. Although Edge Store hosts files, it also enables direct integration with external cloud storage providers like AWS S3 bucket, Azure Blob Storage and other custom providers.
Fast CDN: Edge Store integrates a content delivery network for the optimal serving of files from anywhere in the world. Its network of distributed servers improves performance and also enables file delivery at the best speed.
Large file support: When working with large files, Edge Store automatically splits the upload of such files into multipart uploads, making the upload faster and more stable. It also implements a retry logic in the case of a network issue or any other error.
File protection: Edge Store provides better file safety with custom edge validations. It helps safeguard file uploads and can also implement proper access control mechanisms.
Automatic thumbnail generation: Manually resizing and optimizing images for different screen sizes can be tedious. Edge Store simplifies your workflow by automatically generating thumbnails for images. It provides a thumbnail for an image if it is bigger than a specific size.
Project Setup
Run the command below to create a Next.js application:
npx create-next-app
For the resulting prompts, add a preferred name and preconfigure the rest of the application as shown below.

Navigate into the created directory and run the command below to install the necessary dependencies:
npm install @edgestore/server @edgestore/react zod
The edgestore/server is the core package for Edge Store. It provides the server-side functionality for managing files. The edgestore/react package offers the React components and hooks necessary to interact with the Edge Store server functionality from your client-side application. Zod is a data validation and schema definition library. Edge Store uses Zod for improved type safety.
Next, run the command below to start your development server:
npm run dev
Getting Started with Edge Store
Integrating Edge Store in Next.js applications requires configurations on both the server side and client side. However, before we can continue, we need to create a new project on the Edge Store web platform to gain access to the required secret and access key.
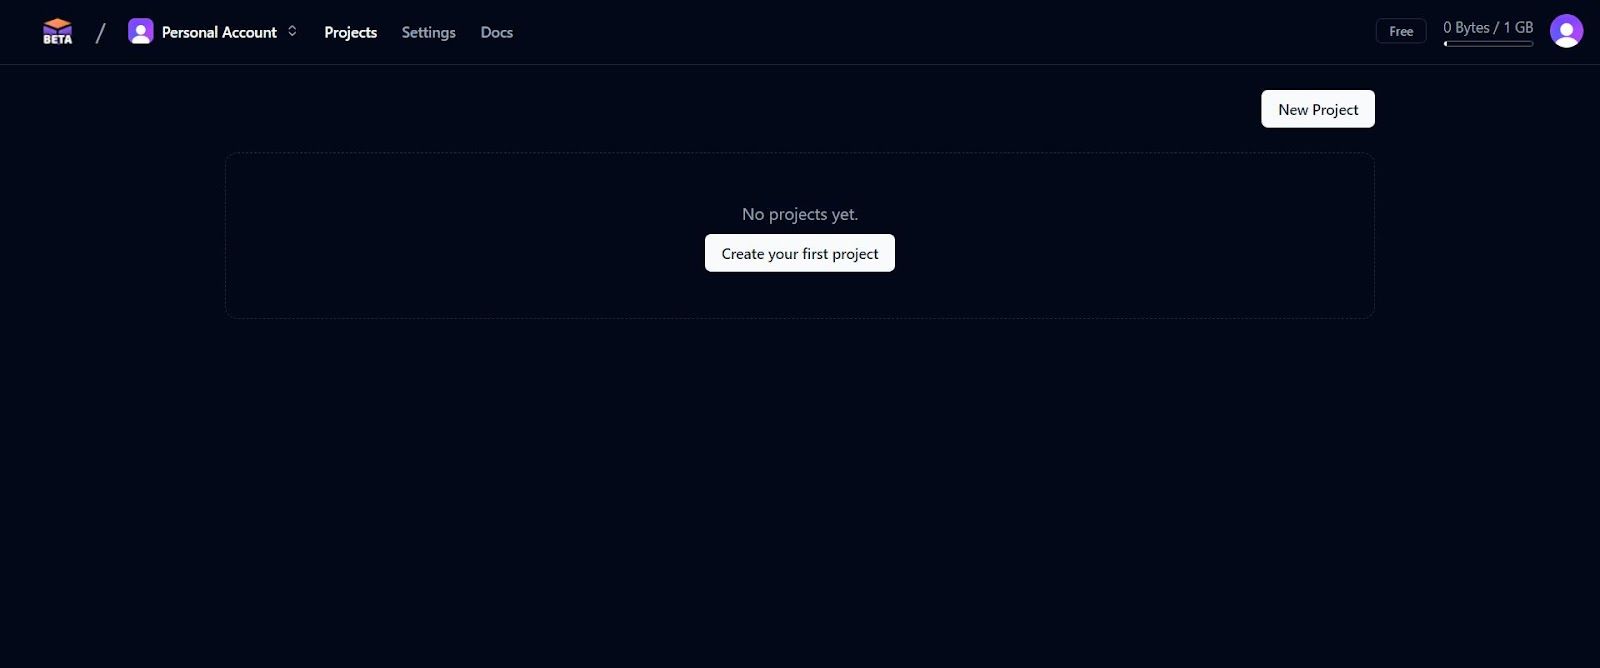
Visit this link to create an account or log in if you already have an Edge Store account. After successfully completing the onboarding process, click “Create your first project” on the resulting page to add a new project.
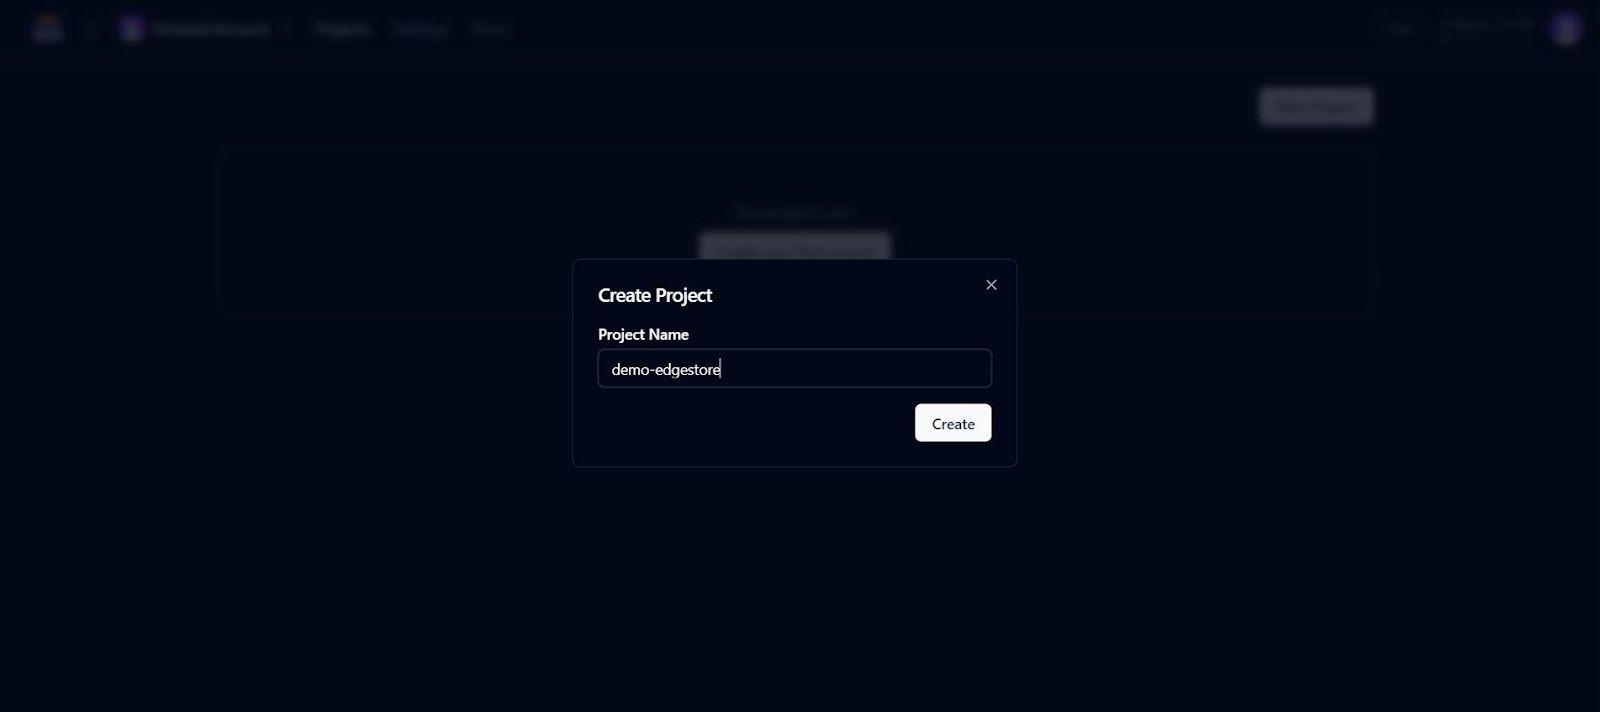
Add a project name for the application and click on the “Create” button.
Next, you should see a new page with a distinct secret and access key.
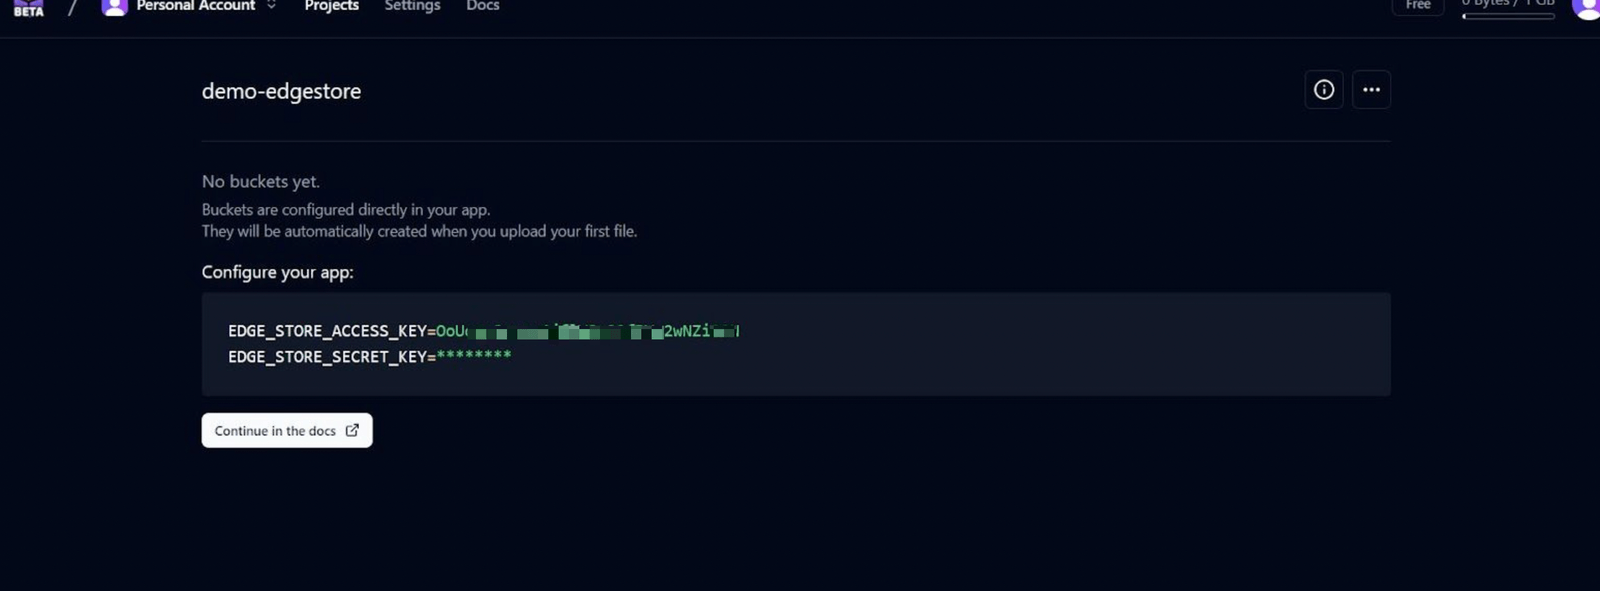
At the root of your project, create a file named .env, and define the keys as environment variables as shown below:
EDGE_STORE_ACCESS_KEY=<<Your access key>>
EDGE_STORE_SECRET_KEY=<<Your secret key>>
Now, let’s configure Edge Store on the server side of the application.
Server-Side Configuration
Create an api/edgestore/[…edgestore]/route.ts file in the src/app folder and add the following to it:
import { initEdgeStore } from "@edgestore/server";
import { createEdgeStoreNextHandler } from "@edgestore/server/adapters/next/app";

const es = initEdgeStore.create();

const edgeStoreRouter = es.router({
  myPublicImages: es.imageBucket(),
});

const handler = createEdgeStoreNextHandler({
  router: edgeStoreRouter,
});

export { handler as GET, handler as POST };
export type EdgeStoreRouter = typeof edgeStoreRouter;
The file contains all the server-side configurations for Edge Store. It creates an API route that catches all the requests under the Edge Store API.
At the top of the file, we imported two vital components, initEdgeStore and createEdgeStoreNextHandler, from their respective packages.
initEdgeStore imports from the core package for Edge Store and serves as the main object for initiating the Edge Store builder.
createEdgeStoreNextHandler, on the other hand, is a function that imports from the Edge Store adapter for Next.js App Router applications. It can be used to create the main Edge Store API route handler.
Next, we initiated the Edge Store builder and created the main router for the Edge Store bucket.
You can think of Edge Store buckets as a distinct file collection. There are two types of file buckets: imageBucket and fileBucket. Both buckets operate almost in the same way, except that while fileBucket allows working with files of all types, imageBucket only accepts files with certain mime types.
Next, we created the Edge Store API route handler and passed the defined router to it. Then, it was exported for both GET and POST requests.
Finally, we generated and exported the router type which will be used to create the type-safe client for the frontend.
With that, we now have a basic server-side configuration to start uploading images.
Client-Side
Create a file named lib/edgestore.ts in the src/ folder and add the following to it:
'use client';

import { type EdgeStoreRouter } from '../app/api/edgestore/[...edgestore]/route';
import { createEdgeStoreProvider } from '@edgestore/react';

const { EdgeStoreProvider, useEdgeStore } =
  createEdgeStoreProvider<EdgeStoreRouter>();

export { EdgeStoreProvider, useEdgeStore };
Here, we imported and initiated our context provider.
Let’s now wrap our application with the provider in the src/app/layout.tsx file as shown below:
import type { Metadata } from "next";
import { Inter } from "next/font/google";
import "./globals.css";
import { EdgeStoreProvider } from "@/lib/edgestore";

const inter = Inter({ subsets: ["latin"] });
export const metadata: Metadata = {
  title: "Create Next App",
  description: "Generated by create next app",
};
export default function RootLayout({
  children,
}: Readonly<{
  children: React.ReactNode,
}>) {
  return (
    <html lang="en">
    <body className={inter.className}>
      <EdgeStoreProvider>{children}</EdgeStoreProvider>
    </body>
  </html>
  );
}
We can use the useEdgeStore hook returned from the context initiation to access the type-safe frontend client and use it to upload files. Let’s implement that in the next section.
File Upload
Open your src/app/page.tsx file and replace the code in it with the following:
"use client";
import { ChangeEvent, FormEvent, useState } from "react";
import Image from "next/image";
import { useEdgeStore } from "../lib/edgestore";

export default function Home() {
  const [file, setFile] = useState<File>();
  const [fileRemoteUrl, setFileRemoteUrl] = useState<string>("");
  const { edgestore } = useEdgeStore();
  const handleFileChange = (e: ChangeEvent<HTMLInputElement>) => {
    setFile(e.target.files?.[0]);
  };

  const handleSubmit = async (e: FormEvent<HTMLFormElement>) => {
    e.preventDefault();
    if (!file) return;
    try {
      const res = await edgestore.myPublicImages.upload({ file });
      setFileRemoteUrl(res.url);
    } catch (error) {
      console.log(error);
    }
  };

  return (
    <main className="p-24 flex flex-col items-center gap-6">
      <h1 className="text-2xl font-semibold">Edge Store File Upload Demo</h1>
      <form
        onSubmit={handleSubmit}
        className="flex flex-col gap-4 items-center"
      >
        <input type="file" onChange={handleFileChange} />
        <button className="px-4 py-2 bg-blue-800 text-white font-medium rounded-sm">
          Upload File
        </button>
      </form>
      {fileRemoteUrl && (
        <Image
          src={fileRemoteUrl}
          width={250}
          height={250}
          alt="uploaded-file"
        />
      )}
    </main>
  );
}
In the code above, we defined a form with an input element of the file type. The input element holds an onChange attribute that triggers a handleChange function whenever the input changes; it assigns the selected file to a state variable called file.
Next, we initialized the useEdgeStore hook and grabbed the edgestore client.
When the file upload button gets clicked and the onSubmit function is triggered, and we call the upload method of the publicImages bucket.
The call to the handleSubmit method returns a response that contains the generated image URL as well as other data as shown below.
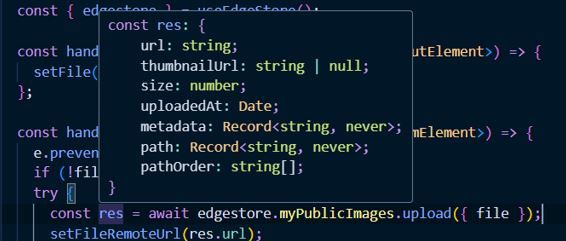
We save the URL in a fileRemoteUrl state, which is then rendered to the page. Because of how modern Next.js works with remote images, we need to add the domain of our images to the nextConfig setup.
Open your next.config.js file at the root level of the application and update it as shown below:
/** @type {import('next').NextConfig} */
const nextConfig = {
  images: {
    remotePatterns: [
      {
        protocol: "https",
        hostname: "files.edgestore.dev",
        port: "",
        pathname: "/**",
      },
    ],
  },
};
export default nextConfig;
You can now save the changes and test the demo application in the browser.
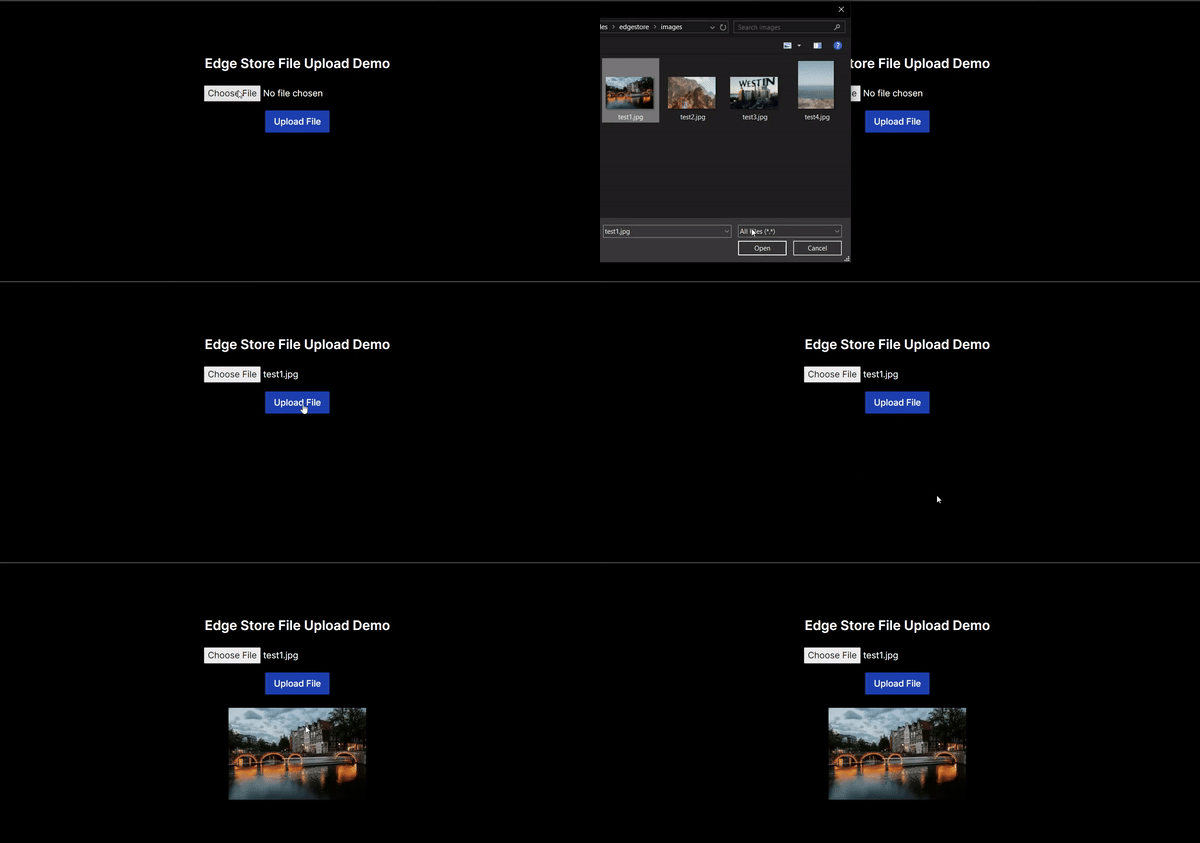
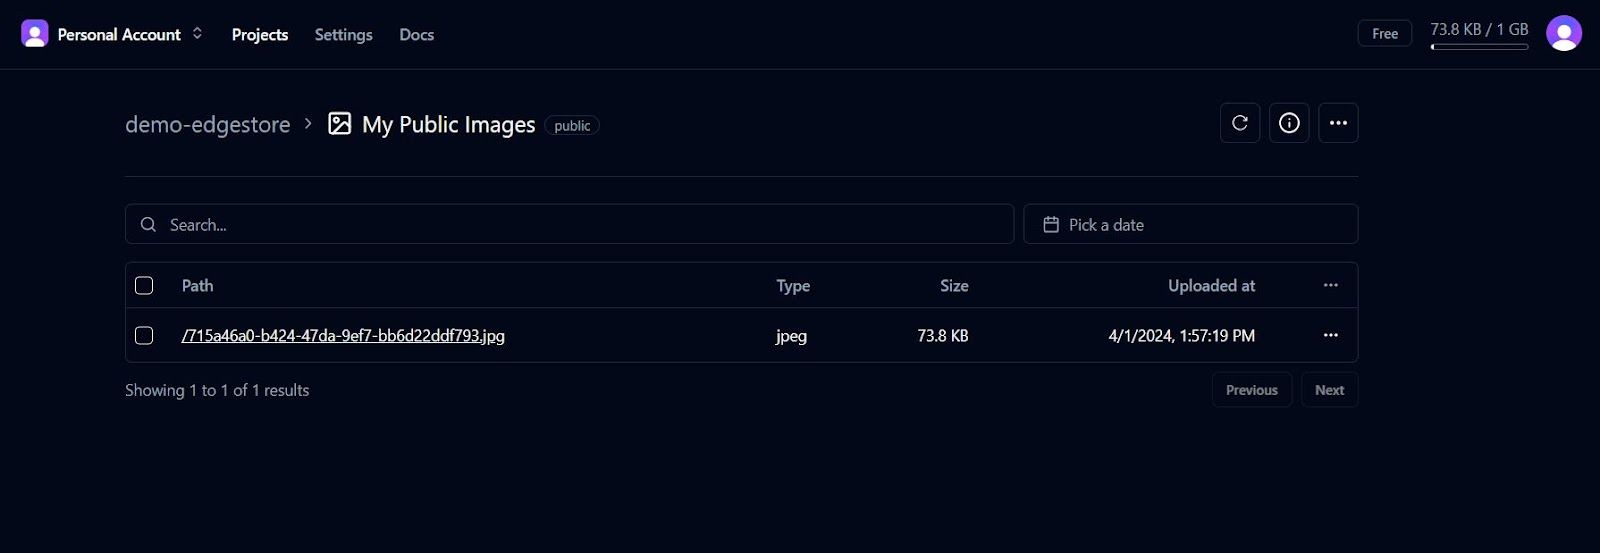
You should also see the uploaded image in your project’s dashboard.
Add Upload Progress Functionality
Edge Store also simplifies the process of implementing an indication of the progress of a file upload. On the upload method, we can register an onProgressChange function that provides access to a variable that can be used for this.
Open the src/app/pages.tsx file and update the code as shown below:
"use client";

import { ChangeEvent, FormEvent, useState } from "react";
import Image from "next/image";
import { useEdgeStore } from "../lib/edgestore";

export default function Home() {
  const [file, setFile] = useState<File>();
  const [fileRemoteUrl, setFileRemoteUrl] = useState<string>("");
  const [progressVal, setProgressVal] = useState<number>(0);
  const { edgestore } = useEdgeStore();

  const handleFileChange = (e: ChangeEvent<HTMLInputElement>) => {
    setFile(e.target.files?.[0]);
  };

  const handleSubmit = async (e: FormEvent<HTMLFormElement>) => {
    e.preventDefault();
    if (!file) return;
    try {
      const res = await edgestore.myPublicImages.upload({
        file,
        onProgressChange: (progress) => {
          setProgressVal(progress);
        },
      });
      setFileRemoteUrl(res.url);
    } catch (error) {
      console.log(error);
    }
  };

  return (
    <main className="p-24 flex flex-col items-center gap-6">
      <h1 className="text-2xl font-semibold">Edge Store File Upload Demo</h1>
      <form
        onSubmit={handleSubmit}
        className="flex flex-col gap-4 items-center"
      >
        <input type="file" onChange={handleFileChange} />

        <div className="h-2 my-4 w-40 overflow-hidden rounded border">
          <div
            className="h-full bg-white transition-all duration-150"
            style={{ width: `${progressVal}%` }}
          ></div>
        </div>
        <button className="px-4 py-2 bg-blue-800 text-white font-medium rounded-sm">
          Upload File
        </button>
      </form>
      {fileRemoteUrl && (
        <Image
          src={fileRemoteUrl}
          width={250}
          height={250}
          alt="uploaded-file"
        />
      )}
    </main>
  );
}
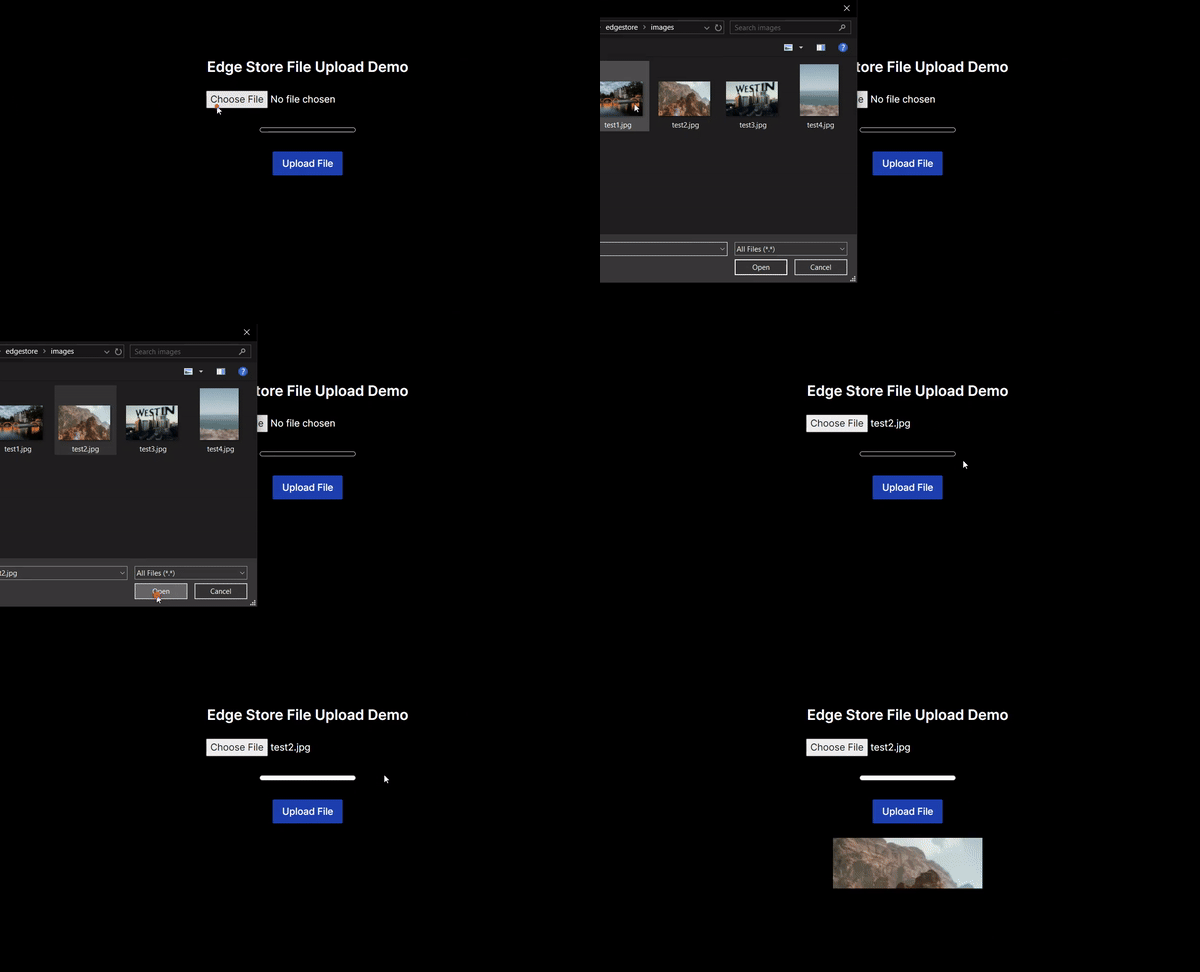
Here, we defined an onProgressChange function to get access to the progress value. The value is saved to the progressVal state and used to render a dynamic progress indicator.
You can now preview the changes in the browser.
Edge Store’s Built-in Components
Instead of manually implementing the file picker logic, Edge Store provides several predefined custom components to handle files, including Single-image, Multi-image and Multi-file components.
The Single-image component allows file selection and introduces additional features like drag-and-drop functionality, image preview and proper state management. The Multi-image component does the same thing as the Single-image component but also accommodates multiple images. The Multi-file component enables the selection of multiple files of all kinds.
Let’s take a look at how one of these components can be used in our demo application.
To add the Multi-file component to our application, create a src/components/MultiFileDropzone.tsx file and copy the code from this link to it, as shown below.

The code relies on some extra dependencies, so run the command below in your terminal to install the required dependencies:
npm install react-dropzone lucide-react tailwind-merge
Let’s create a new demo page that uses the Multi-file component. Create a src/app/new/page.tsx file and add the following to it:
'use client';
import {
  MultiFileDropzone,
  type FileState,
} from '@/components/MultiFileDropzone';
import { useEdgeStore } from '@/lib/edgestore';
import { useState } from 'react';

export default function MultiFileDropzoneUsage() {
  const [fileStates, setFileStates] = useState<FileState[]>([]);
  const { edgestore } = useEdgeStore();
  function updateFileProgress(key: string, progress: FileState['progress']) {
    setFileStates((fileStates) => {
      const newFileStates = structuredClone(fileStates);
      const fileState = newFileStates.find(
        (fileState) => fileState.key === key,
      );
      if (fileState) {
        fileState.progress = progress;
      }
      return newFileStates;
    });
  }
  return (
    <div className='p-10'>
      <MultiFileDropzone
        value={fileStates}
        onChange={(files) => {
          setFileStates(files);
        }}
        onFilesAdded={async (addedFiles) => {
          setFileStates([...fileStates, ...addedFiles]);
          await Promise.all(
            addedFiles.map(async (addedFileState) => {
              try {
                const res = await edgestore.myPublicImages.upload({
                  file: addedFileState.file,
                  onProgressChange: async (progress) => {
                    updateFileProgress(addedFileState.key, progress);
                    if (progress === 100) {
                      // wait 1 second to set it to complete
                      // so that the user can see the progress bar at 100%
                      await new Promise((resolve) => setTimeout(resolve, 1000));
                      updateFileProgress(addedFileState.key, 'COMPLETE');
                    }
                  },
                });
                console.log(res);
              } catch (err) {
                updateFileProgress(addedFileState.key, 'ERROR');
              }
            }),
          );
        }}
      />
    </div>
  );
}
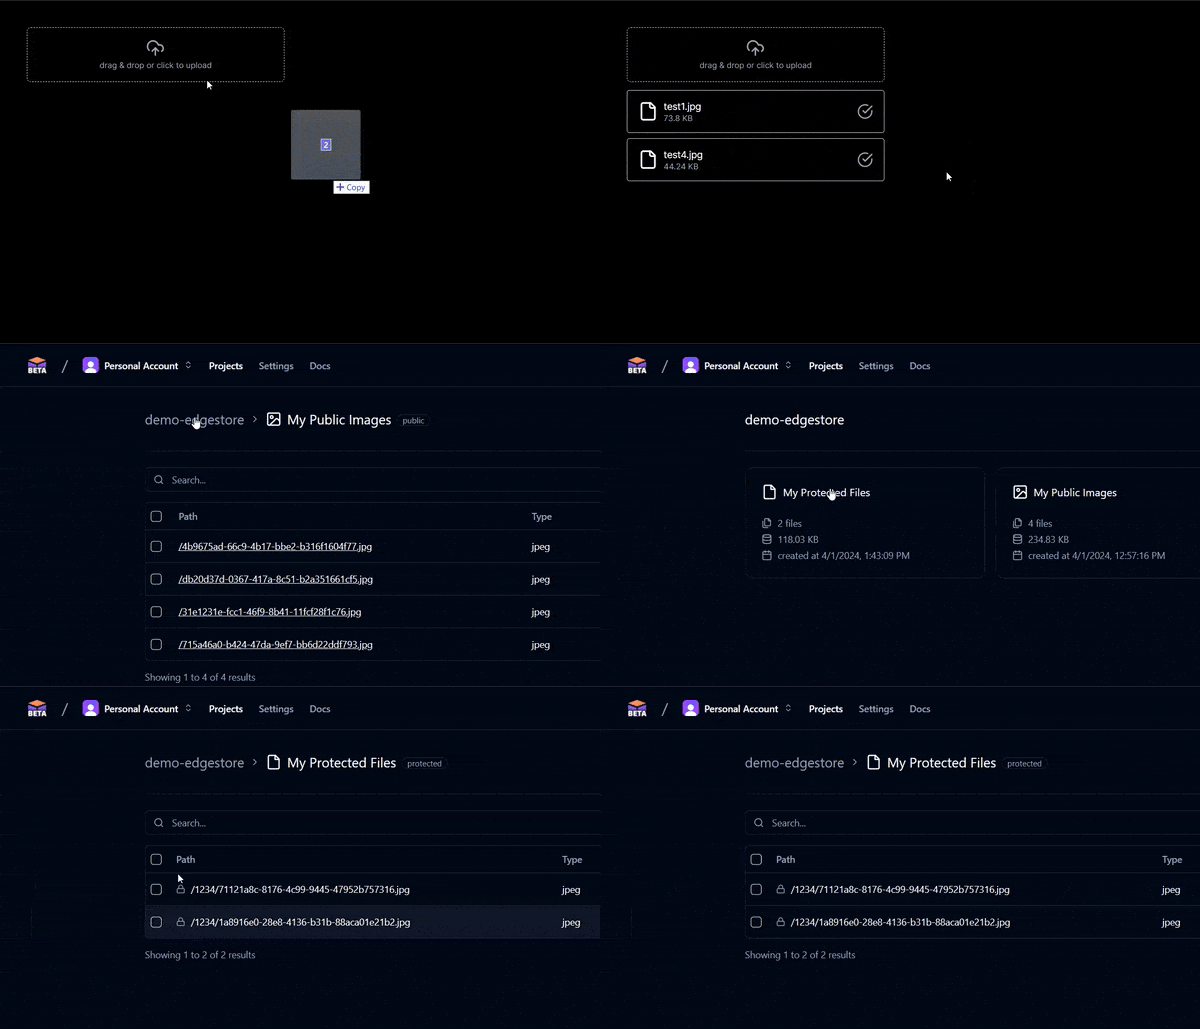
Save the changes, and head over to your browser.

Adding File Validation
With Edge Store, we can set basic file validation without relying on external services. We can set the maximum file size and the accepted mime types for every file bucket as shown below:
const edgeStoreRouter = es.router({
  myPublicIiles: es.fileBucket({
    maxSize: 1024 * 1024 * 10, // 10MB
    accept: ["image/jpeg", "image/png"],
  }),
});
We can also set limits on the Edge Store custom components as well. A sample code snippet is shown below:
<SingleImageDropzone
  width={120}
  height={120}
  value={file}
  onChange={(file) => {
    setFile(file);
  }}
  dropzoneOptions={{
    maxSize: 1024 * 1024 * 10,
  }}
/>
Here, a size limit of 10 MB was defined on a single image component.
File Protection
Edge store introduced the concept of Context, which can be used to append metadata and define file access control logic.
To add file protection, open the api/edgestore/[…edgestore]/route.ts file and update the code as shown below:
import { initEdgeStore } from "@edgestore/server";
import {
  CreateContextOptions,
  createEdgeStoreNextHandler,
} from "@edgestore/server/adapters/next/app";

type Context = {
  userId: string;
  userRole: "admin" | "user";
};

function createContext({ req }: CreateContextOptions): Context {
  // get auth session data from your auth setup
  return {
    userId: "1234",
    userRole: "admin",
  };
}

const es = initEdgeStore.context<Context>().create();
const edgeStoreRouter = es.router({
  myPublicImages: es.imageBucket(),
  myProtectedFiles: es
    .fileBucket()
    .path(({ ctx }) => [{ owner: ctx.userId }])
    .accessControl({
      OR: [
        {
          userId: { path: "owner" },
        },
        {
          userRole: { eq: "admin" },
        },
      ],
    }),
});

const handler = createEdgeStoreNextHandler({
  router: edgeStoreRouter,
  createContext,
});

export { handler as GET, handler as POST };
export type EdgeStoreRouter = typeof edgeStoreRouter;
In the code snippet above, we created the Context type to allow only the admin and the owner of a particular file to access the file. Next, we defined a createContext function that gets and returns a user’s auth session data.
For demo purposes, we’ll work with static data. It is required to add the Context to the Edge Store builder as shown below:
const es = initEdgeStore.context<Context>().create();
Next, we created a new myProtectedFiles bucket and updated the main router to add the userId as an owner section to the file path of protected files. Learn more about Metadata and File Paths in Edge Store configuration.
We also defined the access control logic of the protected files to allow access only to the admin and the owner of a particular file.
Lastly, we added the createContext function in the route handler.
const handler = createEdgeStoreNextHandler({
  router: edgeStoreRouter,
  createContext,
});
To show the file protection changes, open the src/app/new/page.tsx file and change the defined bucket to the myProtectedFiles we just created:
<MultiFileDropzone
  value={fileStates}
  onChange={(files) => {
    setFileStates(files);
  }}
  onFilesAdded={async (addedFiles) => {
    setFileStates([...fileStates, ...addedFiles]);
    await Promise.all(
      addedFiles.map(async (addedFileState) => {
        try {
          //update the bucket here to myProtectedFiles
          const res = await edgestore.myProtectedFiles.upload({
            file: addedFileState.file,
            onProgressChange: async (progress) => {
              updateFileProgress(addedFileState.key, progress);
              if (progress === 100) {
                // wait 1 second to set it to complete
                // so that the user can see the progress bar at 100%
                await new Promise((resolve) => setTimeout(resolve, 1000));
                updateFileProgress(addedFileState.key, "COMPLETE");
              }
            },
          });
          console.log(res);
        } catch (err) {
          updateFileProgress(addedFileState.key, "ERROR");
        }
      })
    );
  }}
/>
Save the changes and upload a sample file. You should see that a new bucket was also created for the protected files.
Additional Features
Edge Store provides many beneficial features for working with and managing files. For example, it employs a user-friendly approach for uploading large files. It automatically splits the upload of large files into multipart uploads, increasing the speed and stability of the process.
If a problem arises during the upload (such as network issues), Edge Store automatically implements a retry logic that recovers from the failed part without restarting the entire upload.
Conclusion
Edge Store directly addresses the issues of file handling and management in modern web applications. It achieves this by integrating type safety, component abstraction and a comprehensive set of features. In this article, we looked at Edge Store and some of the benefits it offers. We also created a demo Next.js app application and integrated Edge Store for file uploads in the application.

Christian Nwamba
Chris Nwamba is a Senior Developer Advocate at AWS focusing on AWS Amplify. He is also a teacher with years of experience building products and communities.
