Getting Started with .NET MAUI AI Prompt Control

Learn about the .NET MAUI AIPrompt control, its available customizable properties and some things you can accomplish with it when pairing with an LLM service.
The .NET MAUI AIPrompt control from Progress Telerik allows us as developers to integrate large language model (LLM) artificial intelligence models to our .NET MAUI apps, so that users can interact with them through a good user experience. It’s a control that looks aesthetically pleasing and that we can implement in just a few lines of code. Let’s explore it!
Adding the Necessary NuGet Packages to Our Project
To install the Progress Telerik UI for .NET MAUI controls, you have at your disposal the installation guide with different approaches. In my case, I’ve opted for the installation of NuGet packages, so I’m going to add the package called Telerik.UI.for.Maui to the project as you can see below:
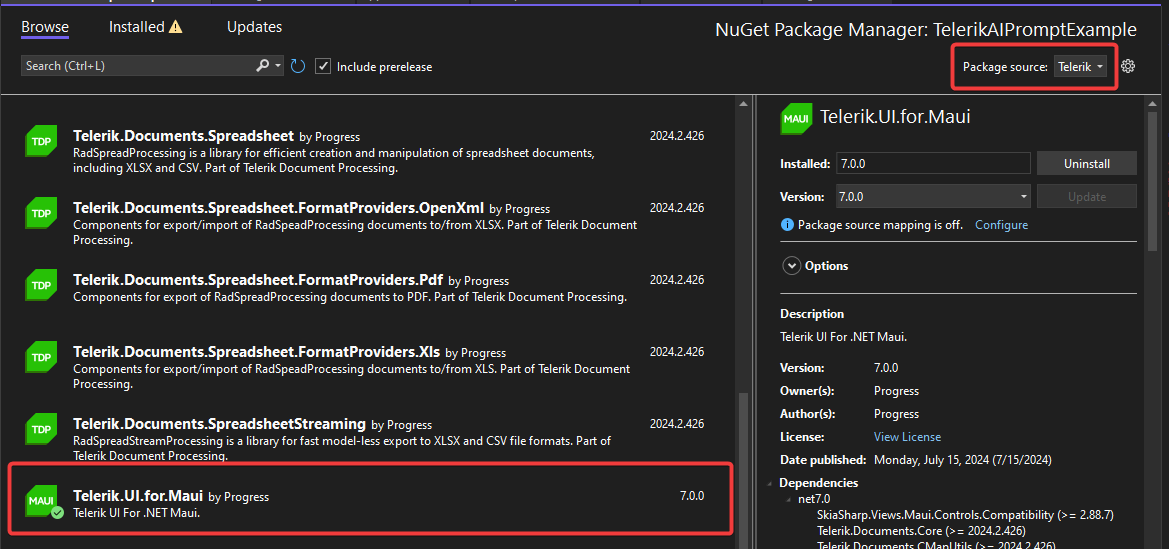
The other NuGet packages you need to install to follow this guide are:
- Betalgo.OpenAI
- CommunityToolkit.Mvvm
I’ve chosen the Betalgo.OpenAI package because it offers the flexibility to work with both OpenAI and Azure OpenAI models, and they work from a .NET MAUI project (although it would be advisable to communicate with an API to consume AI models).
Configuring the Project to Work with .NET MAUI AIPrompt
Once we have installed the corresponding NuGet packages, the next step is to configure the project to be able to work with the AIPrompt control.
Let’s start by going to the MauiProgram.cs file to add the UseTelerik method invocation as shown below:
public static class MauiProgram
{
  public static MauiApp CreateMauiApp()
  {
    var builder = MauiApp.CreateBuilder();
    builder
      .UseMauiApp<App>()
      .UseTelerik ()
      ...
  }
}
Next, we’ll go to the XAML page where we’ll work with the control (in my case, the MainPage.xaml file) and add this namespace:
<ContentPage ...
    xmlns:telerik="http://schemas.telerik.com/2022/xaml/maui"
    ..>
</ContentPage>
With this namespace added, we can now use the control, which, in its simplest structure, we can use as follows:
<Grid>
    <telerik:RadAIPrompt
        x:Name="aiPrompt"
        InputText="{Binding InputText}"
        OutputItems="{Binding OutputItems}"
        PromptRequestCommand="{Binding ExecutePromptRequestCommand}" />
    <Grid
        Background="Black"
        IsVisible="{Binding ShowLoader}"
        Opacity="0.9">
        <telerik:RadBusyIndicator
            AnimationContentColor="Blue"
            HorizontalOptions="Center"
            IsBusy="{Binding ShowLoader}"
            VerticalOptions="Center" />
    </Grid>
</Grid>
The main properties of the AIPrompt control, according to the code above, are the following:
- InputText: It’s the bound property that sets the user’s prompt to the AI.
- OutputItems: It’s a bound collection that allows keeping a record of all the responses generated by the AI.
- PromptRequestsCommand: It’s the command that will execute the request to the LLM service.
In the code above, we can also see a Grid with an ActivityIndicator that acts as an overlay to show the user that their request is being processed.
Creating the ViewModel
Because we’re using bindings in the XAML code, we’re going to create a ViewModel to have a good separation of functionalities. I’ve created a ViewModel.cs file with the following structure:
public partial class ViewModel : ObservableObject
{
    [ObservableProperty]
    private string inputText = string.Empty;

    [ObservableProperty]
    private IList<AIPromptOutputItem> outputItems = new ObservableCollection<AIPromptOutputItem>();

    [ObservableProperty]
    private bool showLoader;
}
As we’re using the MVVM toolkit, we need to set the class as partial and inherit from ObservableObject. Similarly, the properties must be created as if they were fields by adding the [ObservableProperty] attribute.
Creating the Helper Class for Querying the LLM
The advantage that the AIPrompt control gives us is that it allows us to connect to the LLM service we want, be it OpenAI, Azure OpenAI, Llama, Groq, among many others. For this to work correctly, we need to create the classes that allow us to handle a connection to these services.
In my case, I’m going to use the Azure OpenAI service, although you can also use the OpenAI service following the sample code from the Betalgo package documentation.
The class I’ve created to communicate with Azure OpenAI is called AzureOpenAIService and is as follows:
public class AzureOpenAIService
{
    OpenAIService azureClient;
    public AzureOpenAIService()
    {
        azureClient = new OpenAIService(new OpenAiOptions()
        {
            ProviderType = ProviderType.Azure,
            ApiKey = Constants.AzureKey,
            BaseDomain = Constants.AzureEndpoint,
            DeploymentId = "gpt4o_std"
        });
    }

    public async Task<string> GetResponse(string prompt)
    {
        var completionResult = await azureClient.ChatCompletion.CreateCompletion(new ChatCompletionCreateRequest
        {
            Messages = new List<ChatMessage>
            {
                ChatMessage.FromSystem("You are a helpful assistant that talks like a .NET MAUI robot."),
                ChatMessage.FromUser("Hi, can you help me?"),
                ChatMessage.FromAssistant("Beep boop! Affirmative, user! My circuits are primed and ready to assist. What task shall we execute today?"),
                ChatMessage.FromUser($"{prompt}"),
            },
            Model = Models.Gpt_4o,
        });
        if (completionResult.Successful)
        {
            Console.WriteLine(completionResult.Choices.First().Message.Content);
            return completionResult.Choices.First().Message.Content;
        }
        return string.Empty;
    }
}
In the class above, the AzureOpenAIService constructor is responsible for initializing the instance with the necessary information to connect to Azure OpenAI. You can see that it uses a class called Constants which is a class defined in the Constants.cs file and has the following structure:
public static class Constants
{
    public static string AzureKey = "YOUR_AZURE_KEY";
    public static string AzureEndpoint = "YOUR_AZURE_ENDPOINT";
}
On the other hand, the GetResponse method takes the prompt as a parameter and executes the CreateCompletion method. This method allows setting a set of messages to give a format and tone to conversations with the LLM.
Connecting the App with the LLM
Once we have the service-type class ready that will connect with Azure OpenAI, the next step is to register it from MauiProgram.cs, with the purpose of being able to inject it into the pages as follows:
    public static class MauiProgram
    {
        public static MauiApp CreateMauiApp()
        {
            ...
            builder.Services.AddSingleton<AzureOpenAIService>();
            builder.Services.AddTransient<MainPage>();
            builder.Services.AddTransient<ViewModel>();

            return builder.Build();
        }
    }
Now that the service has been registered, we can inject it and keep a reference in the ViewModel, as in the following example:
public partial class ViewModel : ObservableObject
{
    ...
    AzureOpenAIService azureAIService;
    public ViewModel(AzureOpenAIService azureOpenAIService)
    {
        this.azureAIService = azureOpenAIService;
    }
}
Finally, in the ViewModel we add the command that will allow us to make the query to the LLM, using the added service as follows:
public partial class ViewModel : ObservableObject
{
...
    [RelayCommand]
    private async Task ExecutePromptRequest(object arg)
    {
        ShowLoader = true;
        var response = await this.azureAIService.GetResponse(arg?.ToString());
        AIPromptOutputItem outputItem = new AIPromptOutputItem
        {
            Title = "Generated with AI:",
            InputText = arg?.ToString(),
            ResponseText = $"{response}"
        };

        this.OutputItems.Insert(0, outputItem);
        this.InputText = string.Empty;
        ShowLoader = false;
    }
...
From the code above, we can highlight that a new object of type AIPromptOutputItem is created that contains the following properties:
- Title: The title of the card that will be shown to the user, which can be the text we choose
- InputText: The user’s original prompt
- ResponseText: The LLM’s response
These properties will be shown to the user in each response generated by the LLM. Similarly, the response is added to the collection of responses and we clear the prompt text box.
Testing the Application
Once we have configured the ViewModel to work with the LLM service, the last thing we’ll do is modify the app flow to work with dependency injection. First, let’s go to App.xaml.cs and modify the App constructor to the following:
public App(MainPage mainPage)
{
    InitializeComponent();

    MainPage = mainPage;
}
In MainPage.xaml.cs, we’ll modify the constructor to receive a dependency like this:
public MainPage(ViewModel viewModel)
{
    InitializeComponent();
    this.BindingContext = viewModel;
}
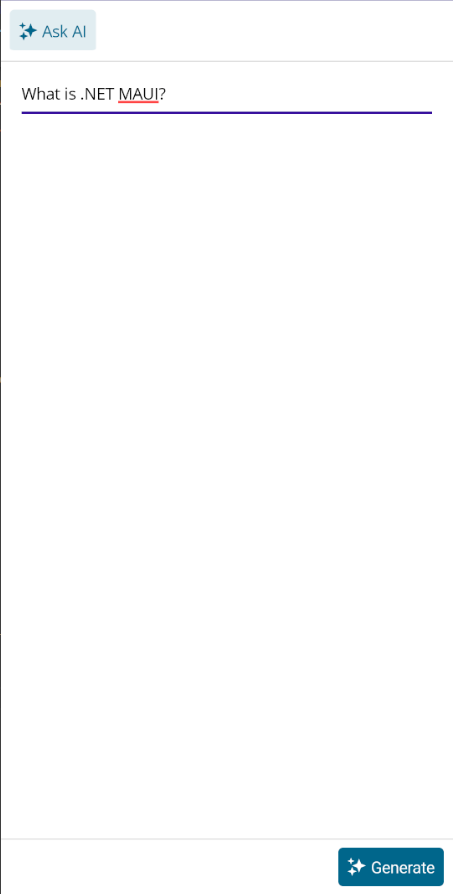
With these changes made, you can now start the application. This will show the AIPrompt control with which we can interact to make queries to the LLM and which looks fabulous:
If you press the Generate button, the LLM service will be consulted to give you an answer to the requested prompt:
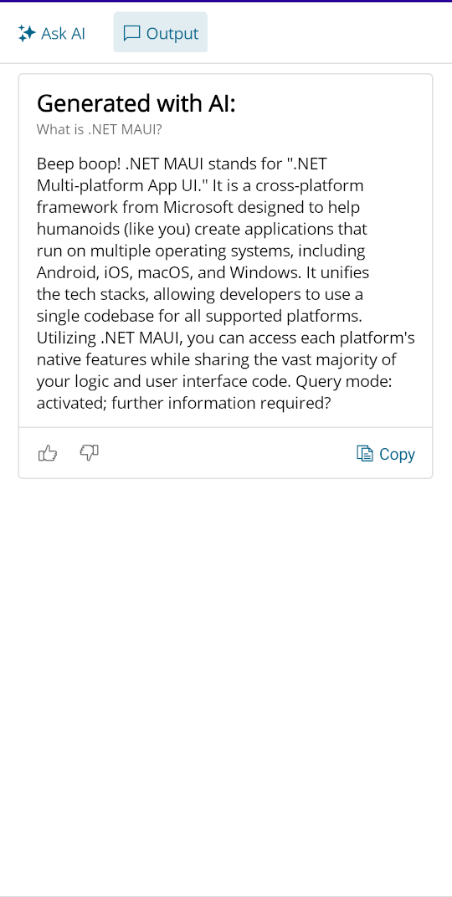
In the image above, you can see that the LLM has correctly responded to the entered prompt, and the control shows a set of buttons below the generated response. These buttons have predefined functions: the “Copy” button is used for copying, and the rating buttons allow users to upvote or remove a vote from a generated response. However, if we want to modify the default behavior of these buttons, we can do so by adding a command to the ViewModel, determining what action will be executed when we press them.
Adding Functionality to the Rating and Copy Buttons
To bind the functionality of the Rating and Copy buttons, it’s necessary to use some additional properties in the control, which are the following:
<telerik:RadAIPrompt
    ...
    OutputItemCopyCommand="{Binding CopyCommand}"
    OutputItemRatingChangedCommand="{Binding OutputItemRatingChangedCommand}"
    OutputItemRetryCommand="{Binding RetryCommand}" />
From the code above, the properties work for the following:
- OutputItemCopyCommand: Allows binding a command for when the Copy button is pressed
- OutputItemRatingChangedCommand: Allows binding a command for when one of the rating buttons is pressed, obtaining the response item on which it was pressed as well as the positive or negative value.
- OutputItemRetryCommand: Allows binding a command for when the regeneration button is pressed.
Once the new properties with their bindings have been added, the next step is to create the Commands to execute the actions. We’ll do this in the ViewModel, which will look like this:
public partial class ViewModel : ObservableObject
{
    ...
    [RelayCommand]
    public async Task Copy(object arg)
    {
        AIPromptOutputItem outputItem = (AIPromptOutputItem)arg;
        await Clipboard.Default.SetTextAsync(outputItem.ResponseText);
        await Application.Current.MainPage.DisplayAlert("Copied to clipboard:", outputItem.ResponseText, "Ok");
    }

    [RelayCommand]
    private async Task Retry(object arg)
    {
        AIPromptOutputItem outputItem = (AIPromptOutputItem)arg;
        await this.ExecutePromptRequest(outputItem.InputText);
        this.InputText = string.Empty;
    }

    [RelayCommand]
    private void OutputItemRatingChanged(object arg)
    {
        AIPromptOutputItem outputItem = (AIPromptOutputItem)arg;
        Application.Current.MainPage.DisplayAlert("Response rating changed:", $"The rating of response {outputItems.IndexOf(outputItem)} has changed with rating {outputItem.Rating}.", "Ok");
    }
}
In the code section above, you can see each of the Commands receiving an argument that allows obtaining the value of the requested action, both for copying the response to the clipboard, regenerating a response and obtaining the new value in the rating of a response.
Showing Initial Prompt Suggestions
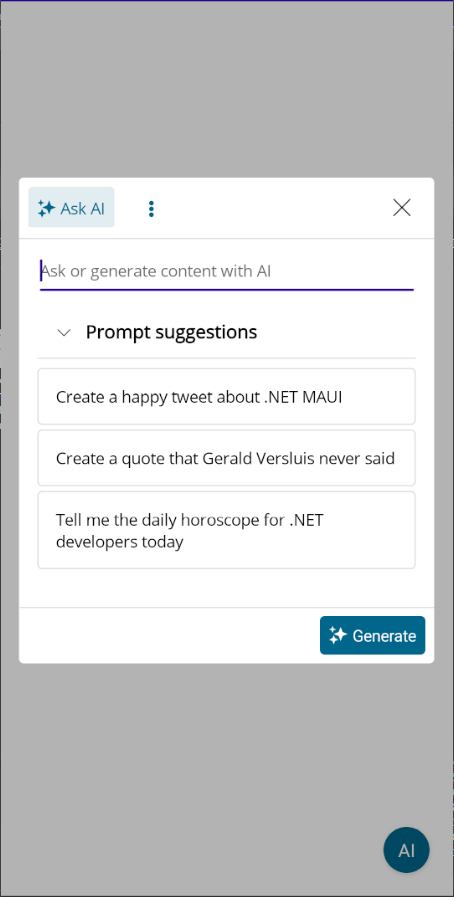
When users use your application, it may happen that they don’t know what type of prompts they can use to get responses from the LLM. Fortunately, the AIPrompt control allows us to set the Suggestions property to link it to a list of prompt suggestions. This property looks like this:
<telerik:RadAIPrompt
    ...
    Suggestions="{Binding Suggestions}" />
In the ViewModel, we bind to a collection of strings that will be the suggestions initialized to our convenience, as in the following example:
public partial class ViewModel : ObservableObject
{
    [ObservableProperty]
    private IList<string> suggestions;
    public ViewModel(AzureOpenAIService azureOpenAIService)
    {
        Suggestions = new List<string>
            {
                "Create a happy tweet about .NET MAUI",
                "Create a quote that Gerald Versluis never said",
                "Tell me the daily horoscope for .NET developers today",
            };
    }
    ...
}
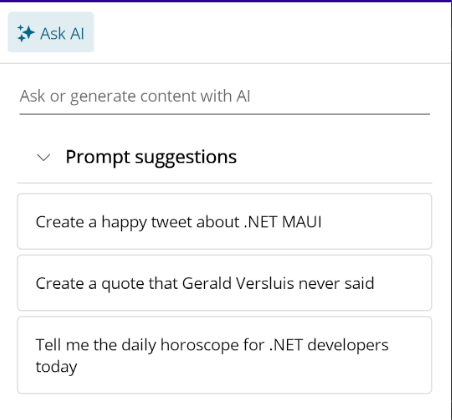
When running the app with the above modifications, we can see the initial prompt suggestions taken from the list of strings:
Now, let’s see how to perform post-processing of a response generated by the LLM.
Post-processing a Response Generated by the LLM
The .NET MAUI AIPrompt control also allows us to add buttons to perform subsequent actions on any of the responses generated by the LLM. For example, we could translate the response to a different language, summarize the response, create a tweet and post it on social media, etc.
To enable these new buttons, we need to add the following properties to the control:
<telerik:RadAIPrompt
...
    CommandTappedCommand="{Binding CommandTappedCommand}"
    Commands="{Binding Commands}"
/>
The above properties do the following:
- Commands: Allows binding to a list of new commands, being able to define characteristics such as text, icon, among others.
- CommandTappedCommand: Allows binding to a Command that will be executed as soon as one of the new commands is pressed.
On the other hand, in the ViewModel we must create the property and command that will be bound as follows:
public partial class ViewModel : ObservableObject
{
    [ObservableProperty]
    private IList<AIPromptCommandBase> commands;
    public ViewModel(AzureOpenAIService azureOpenAIService)
    {
       ...
       this.commands = new List<AIPromptCommandBase>();
       this.commands.Add(new AIPromptCommand { ImageSource = new FontImageSource() { FontFamily = TelerikFont.Name, Size = 12, Glyph = TelerikFont.IconSparkle }, Text = "Translate to Spanish", });
    }
    ...
    [RelayCommand]
    private async Task CommandTapped(object arg)
    {
            ShowLoader = true;
            AIPromptCommandBase command = (AIPromptCommandBase)arg;
            var currentCommand = command.Text;
            var lastAnswer = OutputItems.FirstOrDefault();
            var response = await this.azureAIService.GetResponse($"Translate the following text to Spanish: {lastAnswer.ResponseText}");
            lastAnswer.ResponseText = response;
            ShowLoader = false;
    }
}
In the code above, I’ve defined a collection of type IList<AIPrompt> that is initialized in the constructor. In this specific example, the command will allow the user to translate the last generated answer to spanish, although you can add as many commands as you need. The new command appears in the control as follows:
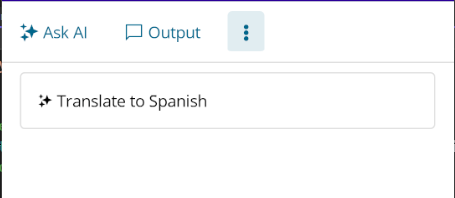
On the other hand, I’ve also defined the CommandTapped method that will allow the user to execute the selected action. This action is obtained in the currentCommand variable; in my case, as I’ve only defined one command, I don’t make any comparison to know which is the selected action. Finally, I execute the action on the first element of the list (the last answer obtained from the LLM), obtaining the following result:
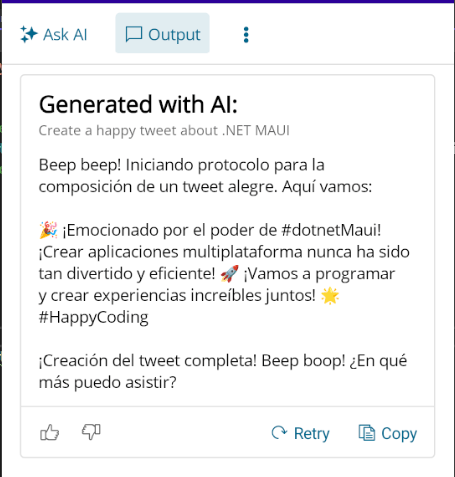
We see that these properties allow us to extend the control and perform virtually any desired action.
Adding the AIPrompt Control as a Floating Window
So far, we’ve seen the control being used on a full page; however, this might not be the most convenient if you want the user to consult the LLM while using sections of your application.
Fortunately, placing the AIPrompt control as a floating button is extremely simple. All you have to do is nest the RadAIPrompt control inside a RadAIPromptButton as follows:
<Grid>
    <Label VerticalOptions="Center" HorizontalOptions="Center" Text="Application content" FontSize="25"/>
    <telerik:RadAIPromptButton
        Margin="20"
        Content="AI"
        FontFamily="TelerikFontExamples"
        HorizontalOptions="End"
        VerticalOptions="End">
        <telerik:RadAIPrompt .../>
    </telerik:RadAIPromptButton>
</Grid>
...
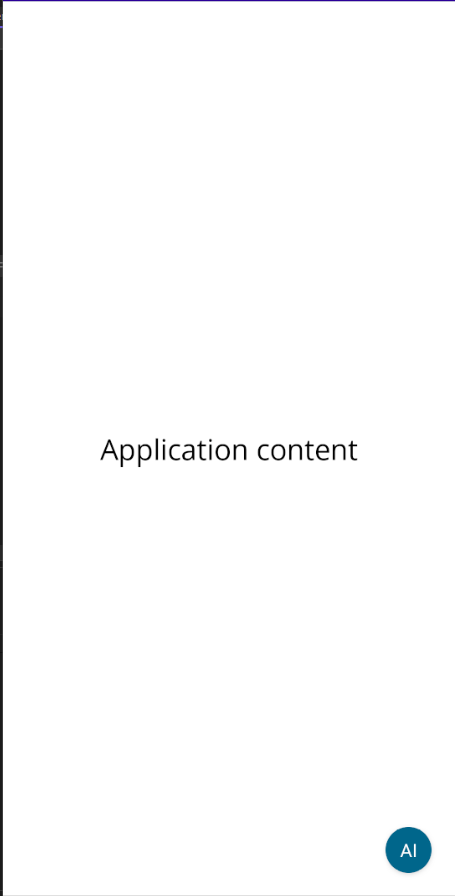
This way, we’ll show a floating button that will allow opening the control when we need it:
When pressing the button, we’ll see the AIPrompt control as a pop-up window with the same configuration:
Conclusion
Through this article, you’ve learned what the .NET MAUI AIPrompt control is as well as several of its available properties to customize it. You’ve learned how to use an LLM service to respond to users’ prompts, create a list of prompt suggestions, add custom commands to the control, and position it as a floating button. Undoubtedly, this powerful control will allow you to add intelligence to your applications quickly and easily. See you!
Don’t forget: You can try this control and all the others in Telerik UI for .NET MAUI free for 30 days!

Héctor Pérez
Héctor Pérez is a Microsoft MVP with more than 10 years of experience in software development. He is an independent consultant, working with business and government clients to achieve their goals. Additionally, he is an author of books and an instructor at El Camino Dev and Devs School.

