Beyond the Basics: Learning About Text-to-Speech in .NET MAUI

Make your applications more accessible with text-to-speech capabilities in .NET MAUI, including customizing pitch, volume and locale.
Incorporating text-to-speech capabilities into applications allows you to create more user-friendly and inclusive applications. For example, consider an application designed for a person with low vision. Reading text may pose a challenge for them. However, if you offer a feature that speaks text out loud, you’ve created an application that caters to their needs and makes their life easier. In this article, I’ll demonstrate how to implement text-to-speech (TTS) in .NET MAUI.
🔧 First of All … What Do I Need?
Initially, we need to include some platform settings. To do so, simply follow the instructions provided below.
 On Android
If your app targets Android 11 (R API 30) or higher, go to Platform > Android > AndroidManifest.xml and add the following node:
<queries>
  <intent>
    <action android:name="android.intent.action.TTS_SERVICE" />
  </intent>
</queries>
The previous configuration adds an intent filter for the TTS engine. For more information, check out the article “Intents and intent filters” in the Android documentation.
🚧 Note that for iOS/Mac Catalyst and Windows, you don’t need any additional configuration.
Understanding the ITextToSpeech Interface
By utilizing the ITextToSpeech interface, you can incorporate text-to-speech capabilities into your
app, allowing the device’s built-in text-to-speech engines to read the provided text aloud. The default implementation of this interface is located in the Microsoft.Maui.Media namespace, and you can access it via the TextToSpeech.Default property.
Implementing TTS
Let’s use use the SpeakAsync method. While the Text parameter is mandatory, there are optional speech parameters that you can use to further customize the experience: Pitch, Volume and Locale.
I’ll explain them in detail with corresponding code snippets to guide you along the way.
- Text: This unique required parameter represents the text that will be read aloud in your application; string type.
private async void TexToSpeechClicked(object sender, EventArgs e)
{
  await TextToSpeech.Default.SpeakAsync("Hello! My name is Leo!");
}
- Speech options: These optional parameters enable you to modify the voice’s volume, tone, and location configuration.
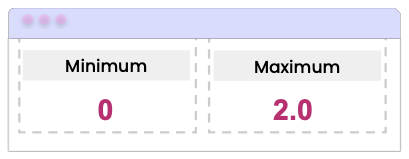
- Pitch: This parameter can accept a range of values, with a minimum and maximum as you can see below; float type.

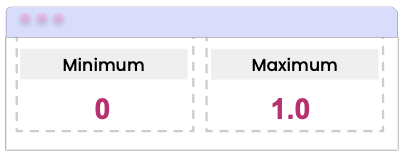
- Volume: This parameter accepts the following values as minimum and maximum when speaking; float type.

- Locale: You can obtain the locale using the
GetLocalesAsync()method, which provides you with a collection of the locales represented by the operating system; locale type.
Now that you have a good understanding of the Pitch, Volume and Locale parameters, let’s see how you can combine these elements using SpeechOptions.
private async void TexToSpeechClicked(object sender, EventArgs e)
{
  IEnumerable<Locale> locales = await TextToSpeech.Default.GetLocalesAsync();
    SpeechOptions options = new SpeechOptions()
    {
      Pitch = 1.2f,
      Volume = 0.55f,
      Locale = locales.FirstOrDefault()
	};

	// Write the text-to-speech method here

}
Finally, let’s add the SpeakAsync method. Replace the previous line of code that says // Write the text-to-speech method here with the following code:
await TextToSpeech.Default.SpeakAsync("Hello! I'm Leo!",options);
CancellationToken: Using the optional parameterCancellationToken, you can interrupt the utterance once it starts.
CancellationTokenSource cts;

private async void TexToSpeechClicked(object sender, EventArgs e)
{
  cts = new CancellationTokenSource();
  await TextToSpeech.Default.SpeakAsync("Hello! I'm Leo!",cancelToken: cts.Token);
}
✍️ The previous example ensures that the method waits until the utterance has finished executing before continuing.
What About Multiple Speech Requests?
When multiple speech requests are made from the same thread, TTS will queue them automatically.
Below is an example that uses the WhenAll method to create a task that will complete only when all Task objects in an array have completed:
bool isBusy = false;

public void TexToSpeechClicked()
{
  isBusy = true;

  Task.WhenAll(
    TextToSpeech.Default.SpeakAsync("Example 1"),
	TextToSpeech.Default.SpeakAsync("Example 2"),
	TextToSpeech.Default.SpeakAsync("Example 3"))
  .ContinueWith((t) => { isBusy = false; }, TaskScheduler.FromCurrentSynchronizationContext());
}
Limitations
- Official support for background audio playback is not provided.
- Cross-thread calling of the expression queue is not guaranteed.
Conclusion
By now, you should be able to implement text-to-speech in your .NET MAUI applications. I hope this article was helpful to you! I encourage you to implement it in your next project. 💚💕
See you next time! 💁♀️
References
This article was based on the official .NET MAUI documentation from Microsoft.

Leomaris Reyes
Leomaris Reyes is a Software Engineer from the Dominican Republic, with more than 5 years of experience. A Xamarin Certified Mobile Developer, she is also the founder of Stemelle, an entity that works with software developers, training and mentoring with a main goal of including women in Tech. Leomaris really loves learning new things! 💚💕 You can follow her: Twitter, LinkedIn , AskXammy and Medium.

