Announcing NuGet Keys

I am excited to announce a new feature in Your Account—NuGet Keys. You can now generate a unique key that can be used to authenticate with the Telerik NuGet server to restore packages in your CI (Continuous Integration) or desktop environment.
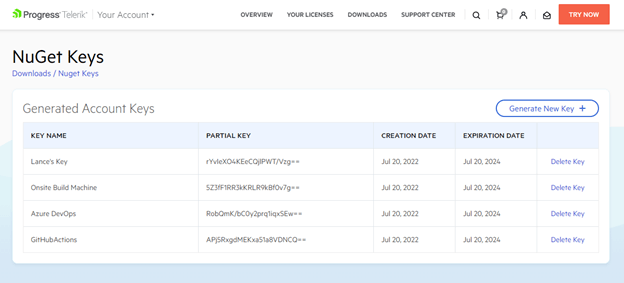
Until now, you could only use your Telerik account’s credentials to authenticate with the Telerik NuGet server. This is fine when the environment is your own dev machine but can be problematic in CI environments like Azure DevOps/GitHub Actions, or a colleague’s machine who needs to restore packages to build a project but doesn't use them directly (e.g., QA, designer, etc.).
The major advantage to using a key instead of a password is if the key compromised or leaked, the scope is very limited; it can only be used with the Telerik NuGet server. A key can be quickly deleted and you can create a new one without affecting the rest of your account.
Generating a NuGet Key
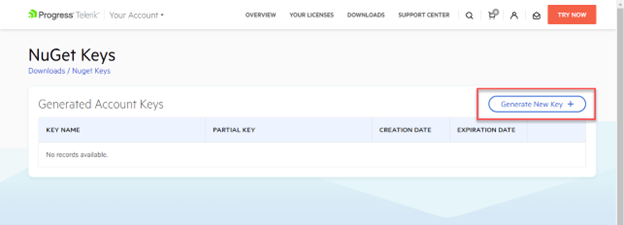
Let’s walk through creating a new NuGet Key. First, log into Your Account and go to your Downloads page. Notice there’s a new Manage NuGet Keys option page—go ahead and select it.

Here you will see a list of any existing keys, and a Generate New Key button to create a new key. Click the button to continue.
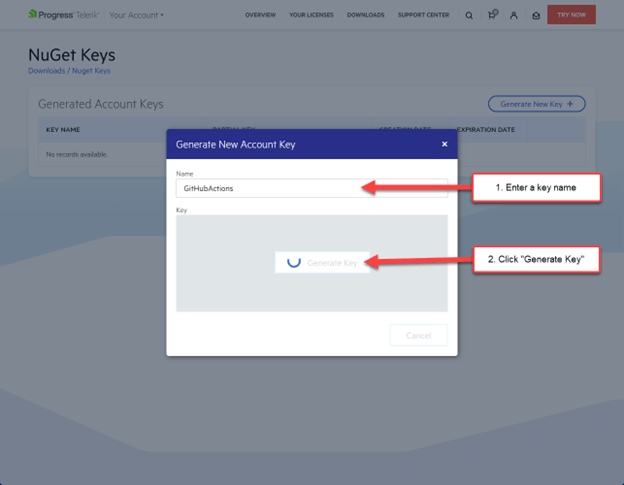
You’ll now see a dialog window appear. Enter a name for the key, then click the Generate Key button.
Once the key is done generating, you will be presented with a Copy and Close button.
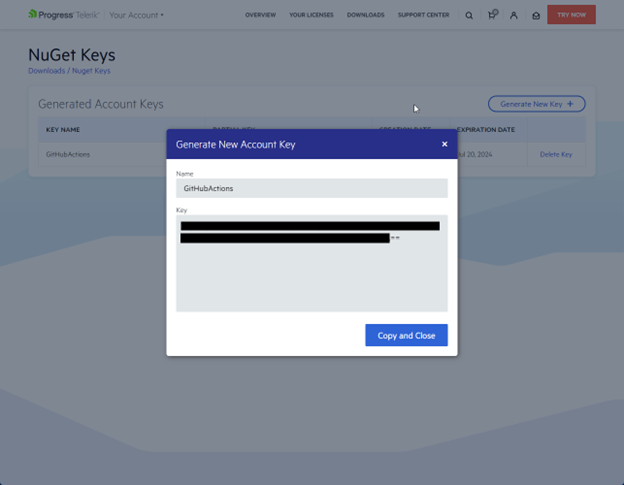
Note: For security reasons, this is the only time you will be able to see the entire key’s value. Be sure to store it securely before replacing the contents of your clipboard.
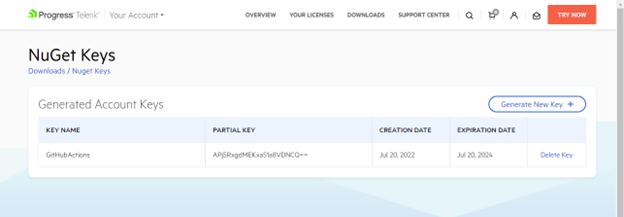
Once you close the dialog window, you will see a list of previously generated key names along with: the partial key’s value, its creation/expiration dates and a delete button.
Protecting Your NuGet Keys
Although a key isn’t your password, a NuGet Key is still valuable to bad actors as they can use it to access all packages under your account’s licenses, and key abuse could lead to an account review. Therefore, you do not want to check it in with source code or leave it publicly visible in plain text (e.g., using the raw key value in a nuget.config file).
You can easily protect the key by storing it as a secret environment variable so that it is not visible to colleagues or in output logs. This comes with additional productivity advantages—for example, when a key expires you only need to update the secret’s value with the new key … no code or CI workflow changes needed.
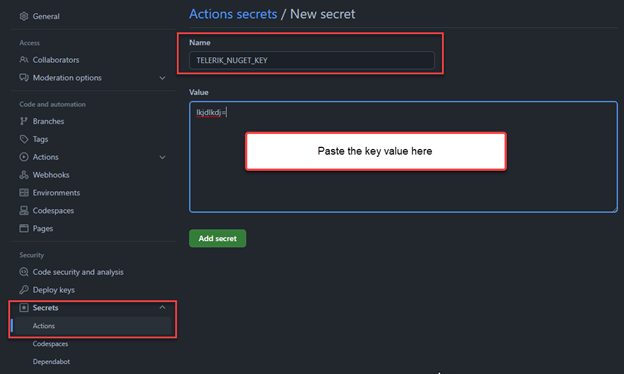
In GitHub Actions, you can save it as a GitHub Actions Secret. This is done using the repository's Settings > Security > Secrets > Actions > Add new secret panel.
In Azure DevOps Classic, you can store it as a secret pipeline variable. This is done in the classic pipeline's Variables tab > Pipeline variables view.

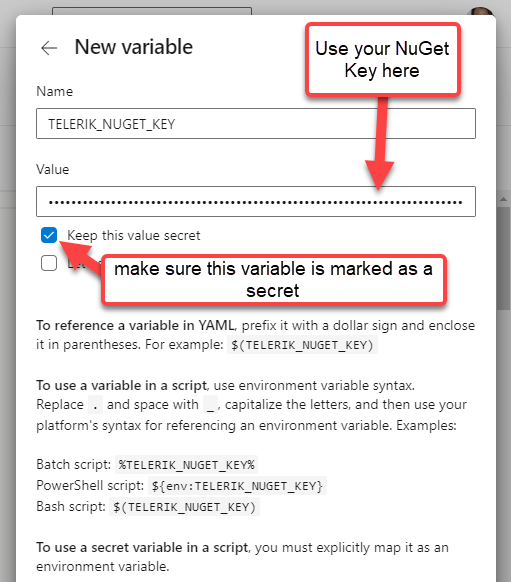
In Azure DevOps YAML pipelines, you store it as a secret variable as well. This is done by clicking the YAML editor's Variables button and completing the “New variable” form.
Pro tip: You can even use Azure Key Vault to store the key and pull in that secret across many pipelines and DevOps servers, see Use Azure Key Vault secrets in Azure Pipelines - Azure Pipelines | Microsoft Docs.
Service Connection
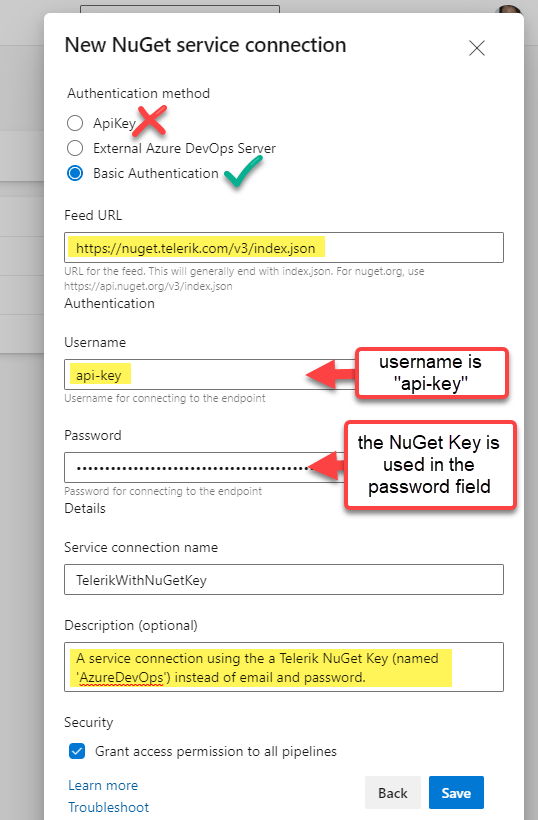
If you’re using an Azure DevOps Service connection instead of secret environment variables, you can use “api-key” for the username and the NuGet Key as the password in the “New Service connection” form editor.
Using a NuGet Key
With the key stored securely, now it’s time to use it in a build. There are two popular ways to use the Telerik NuGet server in a build:
- Using a nuget.config file with your projects
- Using only CLI commands
I’ll show both options briefly to show the NuGet Key difference from using Basic Credentials. For a more thorough walkthrough of using Telerik NuGet server in CI-CD, see my other tutorial at Azure DevOps and Telerik NuGet Packages.
NuGet.Config Option
In your nuget.config file, set the Username value to “api-key” and the ClearTextPassword value to an environment variable name.
<configuration>
  <packageSources>
    <clear/>
    <add key="nuget.org" value="https://api.nuget.org/v3/index.json" protocolVersion="3" />
    <add key="MyTelerikFeed" value="https://nuget.telerik.com/v3/index.json" protocolVersion="3"/>
  </packageSources>
  <packageSourceCredentials>
    <MyTelerikFeed>
      <add key="Username" value="api-key" />
      <add key="ClearTextPassword" value="%MY_API_KEY%" />
    </MyTelerikFeed>
  </packageSourceCredentials>
  ...
</configuration>
Important notes about that nuget.config example:
- I use the environment variable
%MY_API_KEY%instead of the%TELERIK_NUGET_KEY%name we used for the secret variable. This is because CI systems work differently—some will automatically set environment variables using secret variables, while others do not. To keep the demo simple, I used the most compatible option. - It is important that you use “ClearTextPassword’ instead of “Password’ for the second item in the credentials section. This is because “Password” must be a local encrypted value only set by a CLI command and is only supported on Windows (see nuget.config File Reference). Tip: If you accidentally use “Password,” you will get a “The parameter is incorrect” error.
Now, in your next step, you can set the MY_API_KEY environment variable using the value of your pipeline/workflow secret. Then you can just do a package restore with the nuget.config!
In Azure DevOps With a Service Connection
This is exactly the same as if the Service connection was using a username and password. See my original tutorial blog post for guidance on how to use a Service connection: Azure DevOps and Telerik NuGet Packages.
In Azure DevOps Using Secret Variables
Whether you’re using YAML pipelines or classic pipelines, you will be running a PowerShell step to update the nuget.config’s package source.
- task: PowerShell@2
  displayName: 'Restore NuGet Packages'
  inputs:
    targetType: 'inline'
    script: |
      # 1) Use the secret to set the environment variable in the nuget.config
      $env:MY_API_KEY = $(TELERIK_NUGET_KEY)

      # 2) Now you can restore packages with that nuget.config’s file path
      dotnet restore MyProject.csproj --configfile ./nuget.config ...
In GitHub Actions
GitHub Actions YAML lets you use secrets in the workflow. In the following step, we set the MY_API_KEY environment variable using the secret using GitHub Actions env syntax.
- name: Restore NuGet Packages
  run: dotnet restore MyProject.csproj --configfile ./nuget.config ...
  env:
    MY_API_KEY: ${{ secrets.TELERIK_NUGET_KEY }}
Important note: If you are using nuget.exe CLI instead of dotnet nuget CLI, the approach is the same but the spelling/capitalization of some CLI params/flags can be different. Check the documentation for the one you’re using: dotnet nuget CLI docs or the nuget.exe CLI docs.
PowerShell/Bash-Only Approach
If you do not use a custom nuget.config, or if your CI system doesn’t support default environment variable secrets, you can always just use a single CLI add source (or update source) command to set the credentials of a
package source.
In Azure DevOps, the command looks like this:
dotnet nuget add source 'MyTelerikFeed' --source 'https://nuget.telerik.com/v3/index.json' --username 'api-key' --password '$(TELERIK_NUGET_KEY)' --configfile './nuget.config' --store-password-in-clear-text
In GitHub Actions, the command looks like this instead:
dotnet nuget add source 'MyTelerikFeed' --source 'https://nuget.telerik.com/v3/index.json' --username 'api-key' --password '${{ secrets.TELERIK_NUGET_KEY }}' --configfile './nuget.config' --store-password-in-clear-text
Important note: You need to use the --store-password-in-clear-text flag on non-Windows platforms. This is because Linux/MacOS doesn’t have support for encryption. See nuget.config File Reference. Tip: If you accidentally forget the flag, you’ll get a “The parameter is incorrect” error.
Conclusion
If you use the Telerik NuGet server in your CI or inter-department workflows, I’m sure you’ll enjoy the flexibility and security using NuGet Keys will bring to your configurations.
You can always visit the Your Account FAQs for more information about NuGet Keys. If you have any feedback or problems, please reach out to us in the Support Center.

Lance McCarthy
Lance McCarthy is a Senior Manager Technical Support at Progress. He is also a multiple Microsoft MVP (Developer Technologies, Windows Development and Mixed Reality). He covers all DevTools products, specializing in .NET desktop, mobile and web components.
